SAP ABAP HANA AWS Issues
Posted: February 11, 2014 Filed under: HANA, SAP Leave a commentMany a times the HANA instance doesn’t work even though CAL shows green status. We can try just restarting or use the below steps.
- Connect to the instance via putty
- On the command prompt please execute cat /etc/hosts
and check if the ip address of the instance is correctly mapped to the hostname - Switch user via command: su – a4hadm
- Execute the commands:
ABAP status: sapcontrol -nr 00 -function GetProcessList
HANA status: sapcontrol -nr 02 -function GetProcessList - If everything is green you have a connectivity problem this means SAP GUI can’t connect via
your VPN connection to the instance. - If either of the services shows gray or not green, you have to option to restart the complete
instance via the CAL console or you refer to the description in paragraph 8.2
of the document http://scn.sap.com/docs/DOC-45725
which describes how you manually start and stop the services.
SAP ABAP HANA Additions
Posted: February 11, 2014 Filed under: HANA, SAP Leave a commentHANA SQLScript Reference :
Click to access SAP_HANA_SQL_Script_Reference_en.pdf
SHINE Ref :
Click to access SAP_HANA_Interactive_Education_SHINE_en.pdf
Code push down has been the key with HANA but with AMDP ( ABAP Managed Database Procedures ) and CDS ( Core Data Services ), the extra effort of creating objects in HANA as well as ABAP doesn’t need to be done anymore.
AMDP :ABAP Managed Database Procedures are a new feature in AS ABAP allowing developers to write database procedures directly in ABAP. You can think of a Database Procedure as a function stored and executed in the database. The implementation language varies from one database system to another. In SAP HANA it is SQL Script. Using AMDP allows developers to create and execute those database procedures in the ABAP environment using ABAP methods and ABAP data types.AMDPs are introduced to easily enable you to get the best out of ABAP for HANA following the “code push-down” paradigm first introduced with SAP NetWeaver AS ABAP 7.4 .
Creating an AMDP is as easy as it can get in ABAP. You can simply implement SQLScript in an ABAP method:
METHOD <meth> BY DATABASE PROCEDURE
FOR <db>
LANGUAGE <db_lang>
[OPTIONS <db_options>]
[USING <db_entities>].
< Insert SQLScript code here >
ENDMETHOD.
– Every class with AMDP must use interface IF_AMDP_MARKER_HDB.
AMDPs are visible through SE80 but can’t be edited from there.
ABAP Object Services: Some useful additions
Posted: February 9, 2014 Filed under: HANA, SAP, SAP ABAP | Tags: HANA, SAP, SAP ABAP Leave a commentFrom my SCN blog : http://scn.sap.com/community/abap/blog/2014/02/09/abap-object-services-some-useful-additions-to-persistent-and-transient-objects
All modern programming language environments have some kind of ORM ( Object Relationship Mechanism ) mechanism. It allows persistence to be represented as programming language objects. In ABAP object services, we have persistent objects to hold data which we’ll save to database and transient objects to hold data in ABAP memory temporarily.
This blog summarizes my experiences in the additions I had to make while using object services in ABAP.
– In the points 1 and 2, I describe two features I wasn’t aware of but found them based on requirements.
– The last three examples under point 3 are enhanced methods I had to create using RTTI as they’re not created “out of box” by persistent generator mechanism – they’re not strictly persistence but I found myself wishing them with my persistent objects.
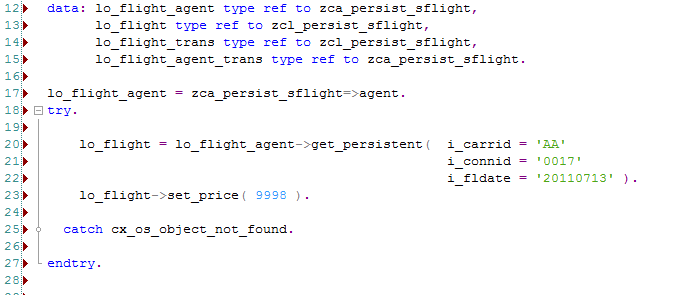
Just to recap about persistent objects, we can get a persistence reference and set values later. So in the below example, lo_flight is a persistent object and we can update price.
Below are the additions I had to make to get object services working efficiently in my own experience.
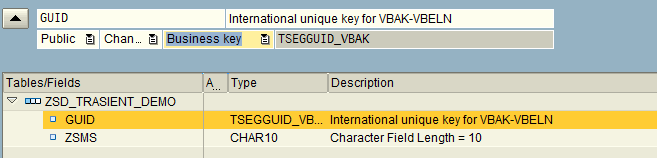
- Adding extra ( non-persistent ) fields to a persistent object : What if we need an attribute on the persistent objects not part of the underlying database table. These can be added as an attribute .

And then will show up as an attribute in the “Persistence Representant” view. As seen below, the attribute gets added .


The field gets added as a normal attribute to the class and can be removed (attributes coming from the table can’t be removed as they’re greyed out ).
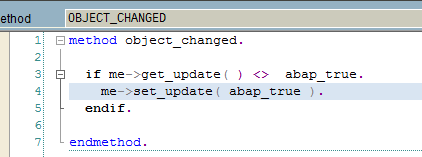
As an example, I had to identify if a peristent object has been changed and I added an extra field ‘update’ for this purpose.
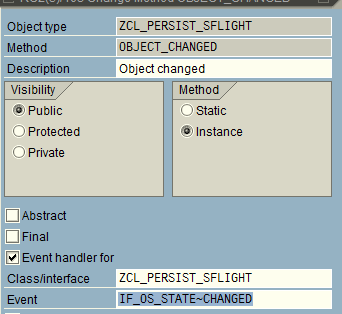
and then tie this attribute with the event IF_OS_STATE~CHANGED to indicate when the object has been modified.
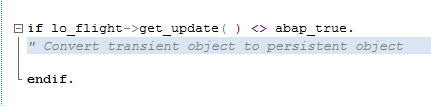
This can be handy if a transient object is converted into a persistent object . e.g. A screen’s PBO gets the transient object and the PAI can check if the object has been modified to trigger the conversion from a transient object to a persistent object.
2. Transient objects in place of ABAP memory: Using transient objects for structures to store memory within a session (as a replacement for ABAP Memory). Many a times, to transfer data with in a session, we export data into ABAP memory and then import it back again. This is fine but this can be difficult to debug in case the export / import locations are not well documented ( imagine data being exported to ABAP memory from an enhancement deep down in a stack and then trying to debug through to find why it’s not set).
A substitute can be to create transient objects from structures.
And we can create a business key which can hold distinct values.
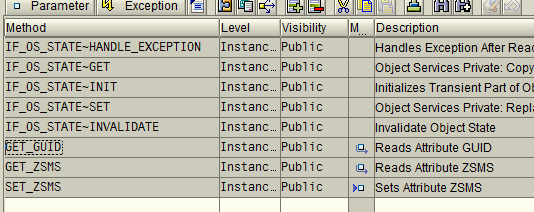
Looking at the method definitions.
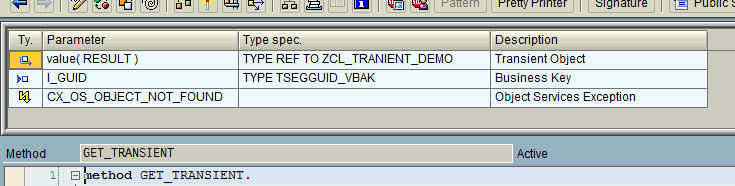
We can create a transient object.

and then retrieve the values.
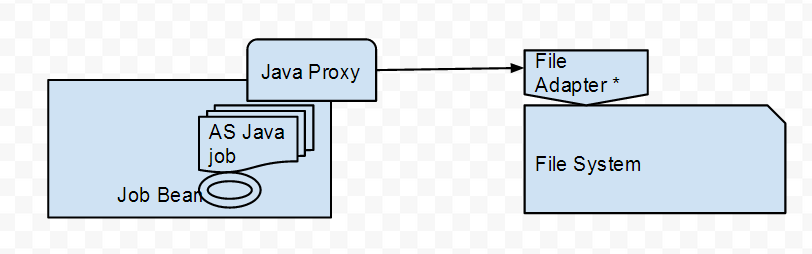
However, if the CREATE_TRANSIENT and GET_TRANSIENT are not in the same stack , this will fail . e.g. if the GET_TRANSIENT was called in a V1/V2 update process whereas the CREATE_TRANSIENT was in the main process, GET_TRANSIENT will fail.The below diagram represents it diagrammatically.

We still need to use SAP memory but at-least we can replace ABAP memory export / import calls by TRANSIENT objects.
3. Enhanced methods in persistence classes: The last three enhancements are based on addition of new methods to persistent classes. Like regular classes, methods can be added to them and are retained even with regeneration due to data dictionary modifications.
a) “Persist” transient objects: Converting transient objects into persistent objects: In point 1, if the object was modified, I was converting the transient object into a persistent one.
It is handy to be able to save a transient object into a persistent one. E.g. duing PBO of a screen, a transient object was created to read attributes and if attributes are modified, the save can be triggered by converting transient objects into persistent objects.
The below method can be called over the attributes we’re interested in persisting .
data: ls_method type seocmpname,
* ls_class type seoclsname,
lt_params type abap_parmbind_tab,
ls_param type abap_parmbind,
dref type ref to data,
lo_excep type ref to cx_sy_dyn_call_error, “#EC NEEDED
ls_par type abap_parmname.
field-symbols: <fs_attr_value> type any.
* To call the dynamic set_* methods, we need to populate kind, name and ref to actual value
* Create the dynamic method name : SET_<attribute>
concatenate ‘set_’ im_attr into ls_method.
translate ls_method to upper case. “#EC TRANSLANG
* Populate ref to data value
create data dref type (im_data_element).
assign dref->* to <fs_attr_value> .
<fs_attr_value> = im_attr_val .
ls_param-value = dref.
*We’re only setting values => param type is exporting
ls_param-kind = cl_abap_objectdescr=>exporting.
* Create the dynamic param name to be passed
concatenate ‘i_’ im_attr into ls_par.
translate ls_par to upper case.
ls_param-name = ls_par.
insert ls_param into table lt_params .
* Call the dynamic method
try.
call method me->(ls_method)
parameter-table
lt_params.
catch cx_sy_dyn_call_error into lo_excep.
raise exception type zcx_test_update
exporting textid = zcx_test_update=>dynamic_method_call_error .
endtry.
b) Convert persistent objects to structure : Sometimes we need to get the structure of persistent objects as there are some operations that can’t be done otherwise e.g. value comparison of all fields. It’s required to convert the peristent objects into structures.
DATA: lrf_structdescr TYPE REF TO cl_abap_structdescr,
lv_method_name TYPE seomtdname,
ls_component TYPE abap_compdescr.
FIELD-SYMBOLS: <fs_component> TYPE ANY.
* Request description of transferred structure
lrf_structdescr ?= cl_abap_typedescr=>describe_by_data( ch_struct ).
* Loop via all components of the transferred structure
LOOP AT lrf_structdescr->components INTO ls_component.
* Set the field symbol to the component of the transferred
* structure
ASSIGN COMPONENT ls_component-name OF STRUCTURE ch_surgery
TO <fs_component>.
* Compose the name of the GET method
CONCATENATE ‘GET_’ ls_component-name INTO lv_method_name.
* Determine the value of the attribute via a dynamic call of
* the GET method and write the value to the structure
TRY.
CALL METHOD me->(lv_method_name)
RECEIVING
result = <fs_component>.
CATCH cx_sy_dyn_call_illegal_method.
CONTINUE.
ENDTRY.
ENDLOOP.
c) Convert structures to persistent objects: And we sometimes need to convert the structure back to a persistent object.
RT_TEST is a reference to the persistence object.
DATA: lo_rtti_struc TYPE REF TO cl_abap_structdescr,
lt_field_list TYPE ddfields,
attr TYPE string,
attr1 TYPE string,
attr_val TYPE string.
FIELD-SYMBOLS: <fs_field> TYPE dfies,
<fs_attr_val> TYPE ANY,
<fs_attr_val1> TYPE ANY.
lo_rtti_struc ?= cl_abap_structdescr=>describe_by_name( struct_name ).
lt_field_list = lo_rtti_struc->get_ddic_field_list( ).
LOOP AT lt_field_list ASSIGNING <fs_field>.
CONCATENATE ‘me->’ <fs_field>-fieldname INTO attr .
TRANSLATE attr TO UPPER CASE.
ASSIGN (attr) TO <fs_attr_val>.
IF sy-subrc = 0.
attr_val = <fs_attr_val>.
attr = <fs_field>-fieldname.
CONCATENATE ‘RT_TEST-‘ <fs_field>-fieldname INTO attr1 .
ASSIGN (attr1) TO <fs_attr_val1>.
<fs_attr_val1> = attr_val.
ENDIF.
ENDLOOP.
SAP HANA with ABAP Installation
Posted: February 3, 2014 Filed under: SAP, Software | Tags: ABAP, HANA, SAP Leave a commentThese steps suffice for installation.
1. Order the appliance from SAP Cloud Appliance Library.
http://www.sap.com/pc/tech/cloud/software/appliance-library/index.html
2. Update AWS details and start the instance.
3. Download Hana Studio, SAPGUI and ABAP ( for Eclipse ) tools.
4. Install the IDEs – don’t install in Program Files. I had issues in getting the ABAP add-ons to show up . Installed in a separate folder and it worked fine.
5. Install licenses for HANA and SAP ABAP systems from SAP’s mini license site: https://websmp230.sap-ag.de/sap(bD1lbiZjPTAwMQ==)/bc/bsp/spn/minisap/minisap.htm
5. Takes around 40 minutes to start the first time around!
The system can be started / stopped from AWS as well but I’ve noticed that while starting the AWS console shows it’s working muche earlier. I prefer Cloud Appliance Library URL – https://caltdc.hana.ondemand.com/
Reference Links :
http://scn.sap.com/docs/DOC-44311
http://scn.sap.com/docs/DOC-41566
DEV GUIDE :
Click to access SAP_HANA_Interactive_Education_SHINE_en.pdf
Ref Scenario:
http://scn.sap.com/docs/DOC-35518
End to End Scenario :
http://scn.sap.com/docs/DOC-41437
Developer id : DEVELOPER with master password during installation.
SAP HANA : SAP Landing Page
http://www.saphana.com/community/learn/solutions/abap-for-hana
Installing SAP Trial ( NSP )
Posted: February 2, 2014 Filed under: SAP, SAP ABAP Leave a commentI’ve installed SAP ABAP trial at least a dozen times but keep forgetting some of the points and then end up wasting time trying to set up everything from scratch . I’ll summarize it for future reference as it’s really an easy process.
Software Requirements:
– Get the NSP trial version from SCN . Google it to get the latest version. Currently, the below URL has the link but who knows what’s the link in future. It should be in “SAP NetWeaver Main Releases’ section.
http://www.sdn.sap.com/irj/scn/nw-downloads
– Download SAPGUI installer separately. I tried using the one with the main bundle and it doesn’t work . SAP should just take it out to from the main package to remove any confusion.
– Install a JDK ( I installed JDK1.5, update 22 ) – not sure if a JRE will suffice but just to be sure I installed Java SDK SE 1.5 .
– Install MS Loopback adapter.
-Download WINRAR in advance.
-Chrome ( My favourite browser ). I’m simply not used to IE anymore and end up installing Chrome. WIll be helpful to keep it ready.
– Virtualbox – it’s useful to have the OS running as a VM for 2 reasons:
a) It’s easy to take snapshots at stages to revert to a working stage.
b) It’s easy to clone machines. I’ve got 2 clones now – one with a Win 7 VM which can be used to install anything and one with a functional SAP NSP system.
Software Installation Process:
– Have a fresh win7 installation ready – better use a base VM and clone it .
– It’s automatic to share resources between host and client machines on VMs – Copy all the software files to the client machine. Host is the base OS and by client I mean the one running on a VM.
– Install Winrar and unrar the software files.
– Install Java.
-MSLoopback adapter is already installed.
– Start SAP installation . It’s natural for it to log off and do a login again . I
– It will give some warnings about conditions not being met. They can be ignored.
– The installation took around 8 hours with step 16 ( import ABAP taking a lot of time ) . Hence, don’t panic if it stays there for along time.
– Install SAPGUI and add NSP to logon .
– You start the system from SAP MMC.
– I wasn’t able to modify the system params ( icm/host_name_full ) from RZ10 . So I just changed the file at OS level directly and restarted SAP .
– Ensure that the host name ( FQDN ) has a .com ( or dot<something> ) as ABAP checks it while trying to get the host etc and you’ll get a short dump .
– SAP help lists all the services required to be activated .
– If the system is timing out on you ( as it’s not very powerful ) , you can increase the timeout for HTTP service from transaction SMICM :-> Go To Services -> Chose HTTP and change time etc.
This version is definitely better ( and more stable in installation ) compared to the previous ones . It has never failed on me .It has Gateway though I haven’t really done anything with it yet.
Installing license keys and developer key for BCUSER.
– I removed the existing license keys as the system name is SAP-INTERNAL and the access keys for BCUSER seems to take an issue with it.
– Go to SLICENSE, remove the license keys and install the new one ( chose the first NSP from the license key request page ) .
– Once the license is installed, you can then try to create custom objects and enter key for BCUSER.
Troubleshooting adapter module JCo RFC calls
Posted: February 2, 2014 Filed under: SAP, SAP ABAP, SAP Java, SAP PI/PO | Tags: ABAP, java, SAP, SAP PI Leave a commentFrom my blog on SCN – http://scn.sap.com/community/pi-and-soa-middleware/blog/2013/12/23/troubleshooting-adapter-module-jco-rfc-calls
Many a times we have adapter modules ( AM ) which in turn do a RFC call to ABAP stack of the XI system to retrieve information. This can be handy to make a generic AM that can be plugged in for multiple interfaces.
As an example, if we already have a text file with idoc data in plain text format, the adapter module can be used to convert this data into idoc format. The ABAP stack FM can be created to inquire idoc metadata information in IDX2 and use it to create the idoc structure.

The different steps are as follows:
1.This step shows the data being processed in the module chain. It’s represented in hex format for the message. So, if we have a text file with content “hello” – the message will be “68 65 6c 6c 6f”.
2.The message is entering the module chain. It can be after reading the file for a sender FTP adapter if this is the first module or after another module call e.g. for code page conversion.

3.As part of the adapter module processing, a RFC call is made using Java Connector ( JCo ) with the message and other parameters. These will be adapter module parameters.
4.The returned message is idoc data in hex format of the XML stream.
5.The message is leaving the adapter module.
6.The data is in hex for the idoc. To make it simple, if the idoc data is “<hello>” the message here is “3c 68 65 6c 6c 6f 3e”.
In the above diagram, the module parameters are sent to the RFC function module in text format though the message data will be hex.

Link:http://help.sap.com/saphelp_nw04/helpdata/en/9a/20e23d44d48e5be10000000a114084/content.htm
With all the above theoretical knowledge, let’s create a simple Java program that can aid in troubleshooting.Pre-requisite Libraries to be added to our project:
1. Google Guava :
Get it from here – http://code.google.com/p/guava-libraries/
2. JCO libs
Get it from service marketplace.
3. Create a jar with the property file: I’ve provided a sample property file. It has the details to make us connect to the host, authenticate
Files to be created:
1. Props.properties : to store connection / authentication details so that it’s easy to change the target instead of hardcoding the values in the program.
2. PropHelper.java : Helper class to read properties file.
3. simulateRFCBean: This is the main class – it’s used for reading the file and making the JCo RFC call.
The steps will be:
1.Check the function module for parameters of type IMPORT (or ask your friendly ABAP colleague about the function module.)

This FM requires two parameters:
SOURCE (the message sent as hexadecimal stream).
SNDPRN (This is a just normal text)
The names won’t have to necessarily match as within the module, we map parameter ‘partner’ to ‘SNDPRN’ for the RFC call.
2.Map the data types to Java using the table mentioned above.
Looking at the function module and the data mapping, we’ll need to
a) Convert the file contents to a hexadecimal string ( byte array in Java )
b) Send the sending system as a string ( String in Java )
3.With the above information, it’s straight forward to create the Java program.
a)Read the JCO properties – PropHelper.java is a helper class to help read these properties instead of hardcoding in the program.
b)Read the file to be checked and convert to byte array.
byte[] fileData = Files.toByteArray(new File(“C://temp//bad3.txt”));
– Do the necessary JCO Set up, set the parameters to be supplied for the RFC call
function.getImportParameterList().setValue(“SOURCE”,fileData);
function.getImportParameterList().setValue(“SNDPRN”,”TESTSENDER”);
and finally, make the call.
function.execute(destination)
Now with the set up done, we’re able to replicate the error scenario.
The issue on the communication channel log indicated.
![]()
Using this program, we’re able to replicate the failure.

For debugging on ABAP, an external break-point needs to be set up in the called function module.

Some of the error scenarios we encountered:
- Bad data – new line appearing in the message.
- IDX2 configuration missing for the unique message combination – existing for the basic type and an extension.
However, once we’re able to simulate the failure and debug the issue, finding the resolution is much easier.
Sourcde code link : https://github.com/viksingh/SimulateRFCCalls
Antifragile software
Posted: February 1, 2014 Filed under: SAP, Software | Tags: ABAP, Nodejs, SAP Leave a commentFrom my blog on SCN – http://scn.sap.com/community/abap/blog/2013/12/01/antifragile-software
Before proceeding further, I have a confession to make – it has mostly nothing to do with ABAP development and it even spans other areas of SAP. For simulation of fault tolerance systems, I used non SAP software However, as it concerns software development and in SAP space what better subspace than ABAP to get opinions of developers, I’m putting it in ABAP development. Hopefully it will be of some use.
I recently read “Anti-Fragile” from Nicolas Nassim Taleb and it kept me wrapped till my eyes were hurting. It is a very good read even though I may not agree with all his notions. Taleb coined the term ‘antfragile’ as there was no English word for what he wanted to express, though there’s a mathematical term – long complexity.
Taleb categorizes objects in the following triads:
– Fragile : This is something that doesn’t like volatility. An example will be a package of wine glasses you’re sending to a friend.
– Robust : This is the normal condition of most of the products we expect to work. It will include the wine glasses you’re sending to the friend, our bodies ,computer systems.
– Antifragile: These gain from volatility. It’s performance thrives when confronted with volatility.
Here volatility means an event that induces stress.If fragile loses from volatility and robustness merely tolerates adverse conditions, the object that gains from volatility is antifragile. Our own bodies are healthier over time with non linear exposure to temperature and food. Our immune systems become better when attacked by disease. And as it’s now obvious in Australia, small naturally occurring fires prevent bigger fires. Spider webs are able to resist winds of hurricanes – a single thread breaks allowing the rest of the web to remain unharmed.
Taleb’s book mostly considers the notions of fragility and antifragility in biological, medical, economic, and political systems. He doesn’t talk about how this can apply to software systems but there are some valuable lessons we can draw when it comes to software systems. Failures can result from a variety of causes – mistakes are made and software bugs can be in hibernation for a long time before showing up. As these failures are not predictable, the risk and uncertainty in any system increases with time.In some ways, the problem is similar to a turkey fed by the butcher – for a thousand days, the turkey is fed by the butcher and each day the turkey feels that statistically, the butcher will never hurt him. In fact the confidence is highest just before Thanksgiving.
Traditionally we have been designing software systems trying to make them robust and we expect them to work under all conditions.This is becoming more challenging as software is becoming much more complex and the number of components is increasing. We use technology stacks at higher levels of abstractions. Further, with onset of cloud, there might be parts which are not even in your own direct control. Your office might be safe but what happens if data centers where the data and applications reside get hit by the proverbial truck.
We try to prove the correctness of a system through rigorous analysis using models and lots of testing. However, both are never sufficient and as a result some bugs always show up in production – especially while interacting with other systems.
For designing many systems, we often look at nature – nature is efficient and wouldn’t waste any resources. At the same time, it has anti-fragility built in – when we exercise, we’re temporarily putting stress on body. Consequently, body overshoots in it’s prediction for next stressful condition and we become stronger.If you lift 100 kg, your body prepares itself for lifting 102 kg next time.
We spend a great deal of effort in making a system robust but much in making it antifragile.The rough equivalent of antifragile is resilience in common language – it is an attribute of a system that enables it to deal with failure in a way that doesn’t cause the entire system to fail. There are two ways to increase resilience in systems.
a) Create fault tolerant applications:The following classical best practices aid in this goal.
– Focus is better than features: Keep classes small and focused – they should be created for a specific task and should do it well. If you see new extraneous features being added, it’s better to create separate classes for them.
– Simplicity is better than anything: Keeping the design simple – It may be fun to use dynamic programming using ABAP RTTI / Java Reflection but if it’s not required, don’t do it.
– Keep high cohesion and loose coupling: If the application is tightly coupled, making a change is highly risky.It makes the code harder to understand as it becomes confusing when it’s trying to do two things at the same time ( e.g. try to do data access and execute a business logic at the same time ). Any change to the business logic change will have to rip through data access parts. As an example, whenever the system needs to communicate with an external system ( say you’re sending messages via an ABAP proxy to PI / some external systems ) , keep the sending part as a V2 update. You don’t want to block the main business transaction processing or hang on to locks.If there are issues with the receiving system being slow or non available, it’ll ensure that your main business document processing doesn’t get affected.
And keeping fault tolerance in mind, the following ideas can help.
– While putting any new code in production, make it unpluggable in case things go wrong.
– Create tools to deal with scenarios when things go wrong. Taking the example scenario when we’re not able to send messages as the external system is down / unable to keep up with the throughput, we should have transactions that can resend these messages after identifying them.
Replica Sets and Sharding: As developers we may not have to worry about too much building fault tolerant infrastructure but it’s helpful to know the following concepts.
– Replica Sets: Create a set of replication nodes for redundancy . If the primary node fails the secondary nodes get activated as primary. For instance, in a three node scenario we can have a primary where all the writes happen ( in green ) and the secondaries ( in red )are asynchronously updated. In case the primary fails, one of the secondaries can become the primary. There can be further variations where reads can be delegated to secondaries if freshness of data is not a concern ( e.g. writes to some data set happens very rarely or at times when the likelihood of application requiring data is very small ).

For simulation, I created a replication set and made the primary node fail. This is how things look when things are going on smoothly . dB writes are issued and the callbacks confirm that the write is successful.

Now, I made the primary node fail so that the secondary becomes the primary. We’re issuing inserts but as the secondary takes some time to become primary, the writes are cached in the dB driver before it gets completed and the callbacks confirm of the update.

Sharding: It’s a horizontal partition of data – i.e. divide the data set into multiple servers or shards.
Vertical scaling on contrast aims to add more resources to a single node which is disproportionately more expensive than using smaller systems.

And sharding and replica sets can be combined .

Integration: Here again, some very simple things help a lot.
– Keeping the communication asynchronous – while designing integration always assume that the different parts will go down and identify steps needed to control the impact. It’s similar to the earlier example of primary node failing .
– In queuing scenarios, bad messages to be moved to an error queue. Thankfully this feature has been added in SAP PI with 7.3X .
However, there is a class of errors that we’re still susceptible to – anything which has a single point of failure. And these could be things external to your application – your firewall configuration etc.
Digital circuits achieve fault tolerance with some form of redundancy .An example is triple modular redundancy (TMR).

The majority gate is a simple AND–OR circuit – if the inputs to the majority gate are denoted by x, y and z, then the output of the majority gate is . In essence we have three distinct pipelines and the result is achieved by majority voting.
Application integration with ESB is definitely better than using point to point communications but it’s susceptible to single node failures. May be need a more resilient integration system?
b) Regularly induce failures to reduce uncertainty: Thinking of fault tolerance in design certainly helps but there can always be certain category of problems that come with no warning. Further, the damage is more if a service breaks down once in five years than a service which fails every two weeks. Hence, the assertion is that by making it constantly fail, the impact can be minimized. ‘DR tests’ in enterprises are an effort in that direction. However, what happens if we don’t want the failure to be like a fire drill. And in fact most failures in future are going to be the ones we can’t predict. Companies like netflix are already using this strategy. They have their own Simian Army with different kinds of monkeys – Chaos Monkey shuts down virtual instances in production environment – instanced which are serving live traffic to customers. Chaos Gorilla can bring an entire data center and Chaon Kong will bring down an entire region. Then there is latency monkey – it causes addition of latency and this is a much more difficult problem to deal
Mobile Development and Antifragile
My experience with mobile development is only for the last couple of years but there are some distinct patterns I can see here. The languages, frameworks, technologies etc. are fun than some of the broader points that emerge are:
– Being antifragile is a feature: The expectation of users is to have the application performing even under volatile conditions – bad / low internet connectivity. We went in the application with a lot of features and then cut down to make it more performant – this was the most critical feature.
– Parallels between antifragile and agile development. Agile processes have short iterations, test driven design and rapid prototyping – they all indicate that failure is inherent and the best way to get out of it is to acknowledge and learn from it to make corrections. In some ways, agile is more honest than the traditional methods where we think we can calculate all the future estimates, know all the risks and know what’s going to fail. The emphasis is on failure being a source of strength than something to be hidden assuming it’ll never be discovered.
Cloud and Antifragile
I’ve very limited experience with cloud and none of it is in production- AWS for developer machines , using SAP’s HANA trial for the open sap course and another provider for trying out some other technologies. I can see two big benefits :
– It’s easier to try out new iterations making the software development process more agile.
– If a component fails, it’s easier to replace them.
Thinking of Failure
Moving to the original notion of what’s the most useful – it is the notion of failure . An antifragile way of developing software does require a shift in way of thinking though.Some of the more important ones being :
– Seeing ‘bugs’ differently : Bugs should be seen as how the system functions under certain situation and the emphasis on what we can learn from it.
– Adoption of a ‘blameless’ culture : Follows from the law of unintended consequences. We create incentives for people to come out as perfect who never fail and consequently we annihilate any change, sometimes slowing down to the extent where we can’t even get much needed changes.
These were some of my thoughts. Like any way of thinking, it may not be an elixir but there are valuable lessons in being antifragile.
Job Scheduling on SAP PO ( SAP PI Java stack )
Posted: February 1, 2014 Filed under: SAP, SAP Java | Tags: java, SAP PI, SAP PO Leave a commentFrom my post on SCN : http://scn.sap.com/community/pi-and-soa-middleware/blog/2014/02/01/job-scheduling-on-sap-po-sap-pi-java-stack
Job Scheduling on SAP PO ( SAP PI Java stack )
Scheduled jobs are one of the most common mechanisms to carry out repetitive tasks. In SAP ABAP stack, we have a comprehensive functionality to schedule jobs in SM36/SM37 etc.
With SAP PO being a SAP AS Java system, there is a need schedule jobs to carry out repetitive housekeeping tasks. However, there could sometimes be additional information to be sent out from SAP AS Java system – an example could be custom information from SAP AS Java tables. There’re web services creates by SAP but in some situations they may not be comprehensive enough for our requirements and hence a way needs to be found to send this information out regularly.
The below diagram describes our requirement – the system on left is SAP PI Java stack.
On the receiving side, it can be replaced by a different mechanism – e..g ABAP proxy if sending the information to an ABAP system.
Steps.
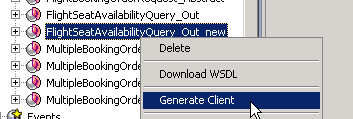
1. Generate proxy for outbound interface: The steps are already described in my previous blog.
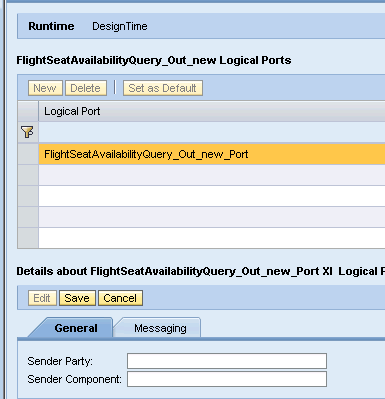
We’re using asynchronous mechanism in this case .Verify that Interface pattern is Stateless.
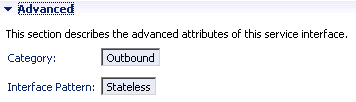
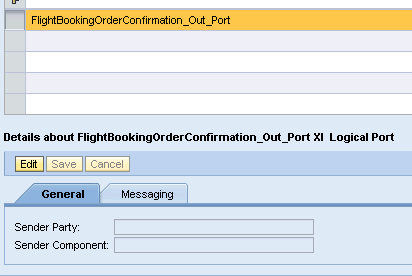
Initially I tried using a service interface with Stateless ( XI 3.0-Comptabible) but the generated proxy won’t have XI logical port .


Where as for FlightBookingOrderConfirmation_Out we get a XI Logical Port.
.
After this step, we have a web and an EAR project.
2. Generate a Job Bean : Create a normal EJB project and then use NWDS options to create a new “scheduler job”.
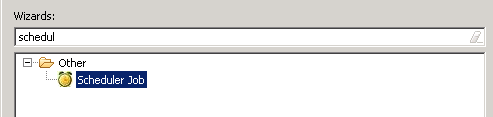
It’ll create an EJB project with a class file to write the logic for our job and extra descriptor files based on values provided in wizard.
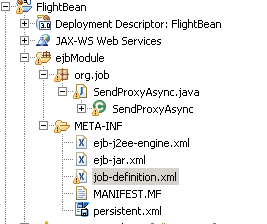
job-definition.xml is a descriptor unique for jobs and holds the job name.

It should match the values generated in the Java file.

Looking at the SendAproxyAsync.java where we implement the job execution logic, add the Proxy Service name.

Main parts of this class:
Logger can be created to log information useful in troubleshooting issues.
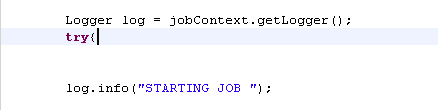
and of course any errors can be logged.
Now, do the usual bit – create XI contect objects, update business data to be sent out and do the outbound proxy call.
Deploy this project.
3. Create an iFlow for this scenario – Nothing too complicated here .We need to create an iFLow for the sender / receiver / interface values. Make sure that the sender communication channel has XI as the message protocol.
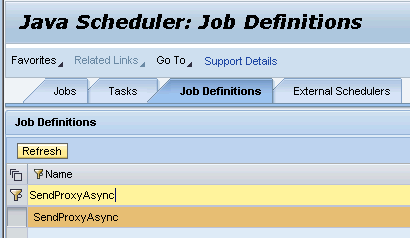
4. Set up in NWA:
We can look at the job definition in NWA by going to Java Scheduler -> Job Definitions.
As we have already deployed our project, we can see the job definition here.
To start executing the job, we need to create a task specifying conditions ( as begin / end time / recurring frequency etc ) .
We select our job and complete the wizard – it’s similar to what we’ll give in SM37 on ABAP stack.
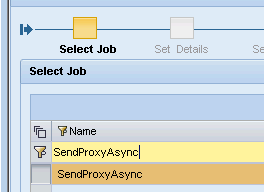
After this step, the jobs will start executing at the specified frequency.
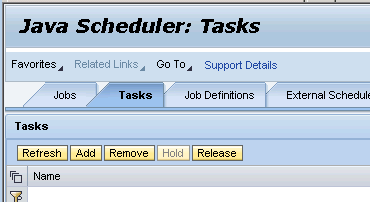
5. Testing:
‘’The executed jobs can be checked in the tab “Jobs”.
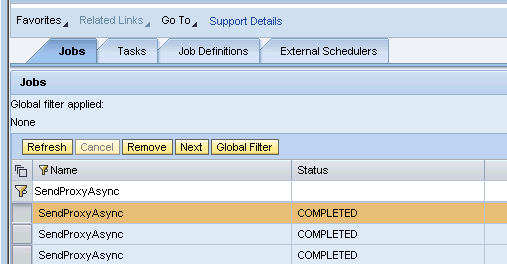
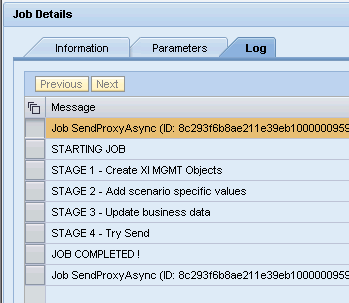
And a log can be displayed with the various messages we have put in the Job Bean – similar to messages on ABAP stack.
Verification : Navigate to PIMON and check messages
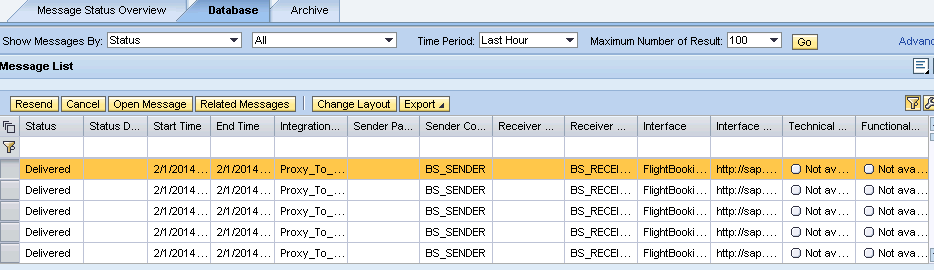
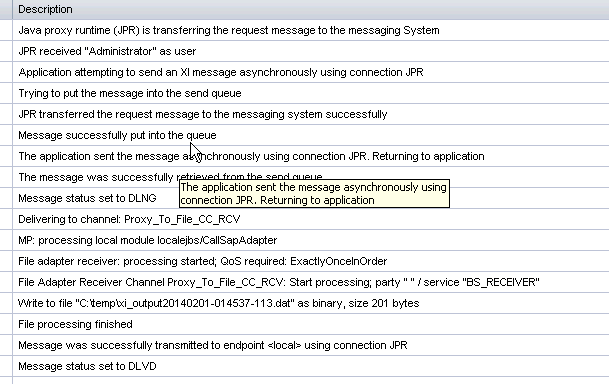
Logs confirm it’s working fine.
The code is at https://github.com/viksingh/PIJavaProxyAsJob . I’ve put the code for only the Java file as others are generated by wizards. For
troubleshooting, looking at system Java logs .
Implementing Sender Receiver Java proxy scenario in SAP PO/PI
Posted: February 1, 2014 Filed under: SAP, SAP Java, SAP PI/PO | Tags: java, SAP PI, SAP PO Leave a commentFrom my post on SCN – http://scn.sap.com/community/pi-and-soa-middleware/blog/2014/01/28/implementing-java-proxy-scenario-on-sap-po
I have been doing some work of late with Java proxies on SAP PO .I tried to use product documentation to understand their working. Product documentation is always the best source of information but things are much clearer for me after I’ve already developed something using a concrete example.
I hope that this post will be useful for anyone trying out SAP PI Java proxies. Here both the sender as well as receiver are Java proxies and it has been implemented on a 7.31 SAP PO system.
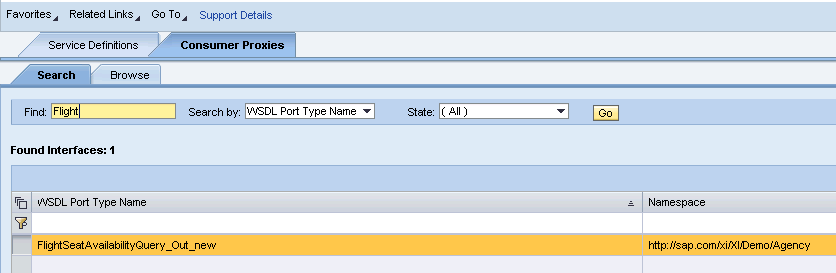
Scenario: We’ll use the flight demo model scenario with two Java proxies – interfaces FlightSeatAvailabilityQuery_Out_new for outbound service call and FlightSeatAvailabilityQuery_In_new for inbound service implementation.
Broadly, we’ll have three major objects:
Sender Proxy ( Consumer ) – Being sender, this proxy doesn’t provide any service but is used to make the outbound service call.
Receiver Proxy – It has the actual service implementation .
Servlet ( for testing ) – As the proxy calls are to be in an JEE environment, we’ll create a simple Servlet for testing.
At a high level, the below diagram shows what we’ll end up creating. We’ll need to create a configuration scenario as well but that shouldn’t cause too much grief.

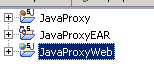
We need to create the below projects in NWDS. The names in italics are our project names.
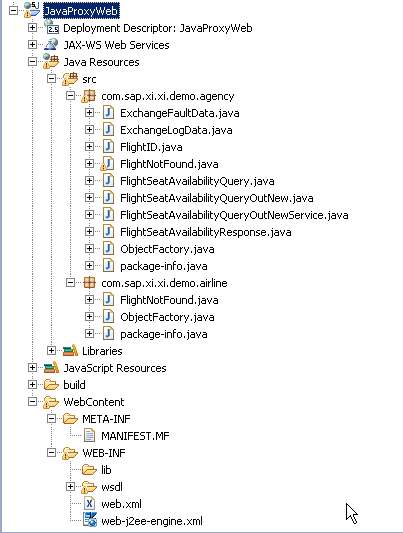
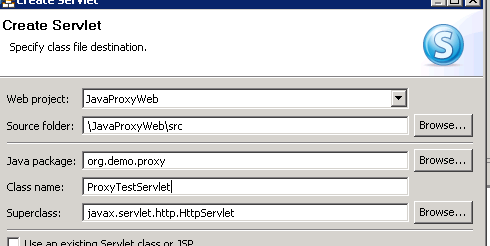
a) Dynamic Web Project ( JavaProxyWeb ). This will hold consumer proxy (sender objects) and servlet used for testing.
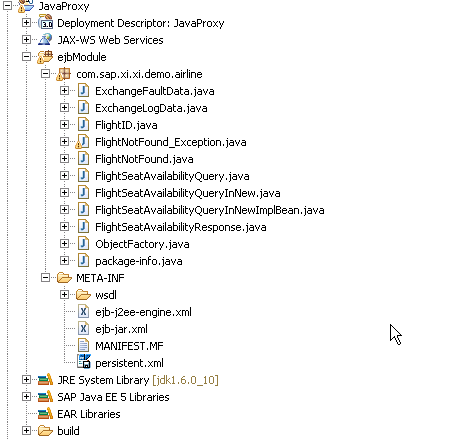
b) EJB Project ( JavaProxy ) : This will hold service implementation on the receiver side.
c) EAR (JavaProxyEAR) – EAR to deploy JEE objects.
So we have the below three projects to start our work..
Consumer Proxy Generation
Let’s generate code on the sending side ( consumer proxy ) . We don’t want to chose a Javabean as there is no actual service implementation. We’re just generating client to call our proxy and hence chose “Generate Client”.
.
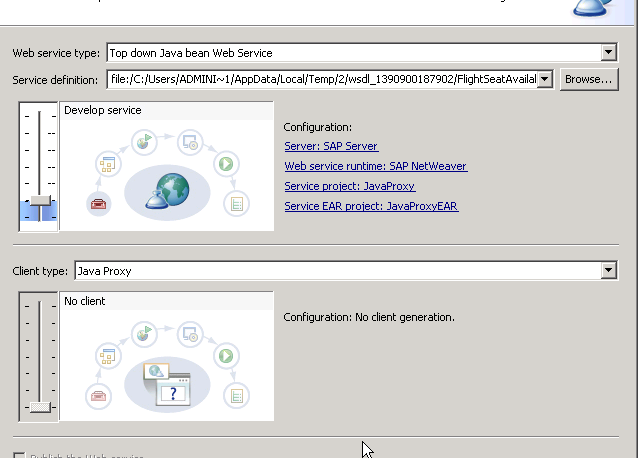
In the next screen , check the values of Server/ WebService runtime and verify your Dynamic Web Project and EAR project are chosen.
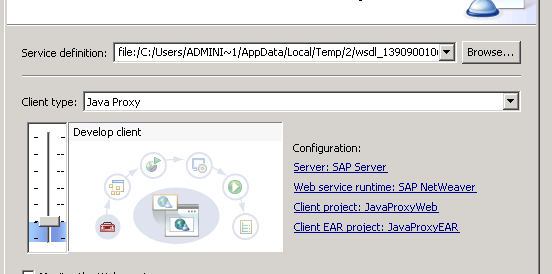
And we don’t have to WSDL as we’re not really using the end-points for any service all . We’ll be creating a configuration scenario in PI Designer to generate the configuration.
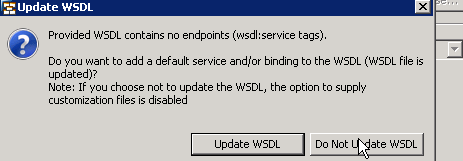
After that, let the wizard go through default values and just press finish.
Inbound Service Generation
For our inbound service implementation, let’s take the corresponding service interface. This time we want to generate a bean and hence chose “Generate JavaBean Skeleton”.
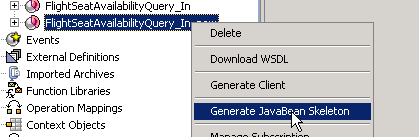
And as we’re not really going to use any client, we can move the slider for client to minimum and just generate the shell for the Web Service.
Our EJB project looks something like this.
And the web project should look similar to this.
Adding Servlet to web project ( for testing )
As we need a servlet for testing, let’s create one in our web project.
Additions to servlet which makes the outbound proxy call object
Add the WebService annotation with the service name and create an instance of the Service.

This is the outbound service call. We need to create an instance of port and as we’re using XI as the message protocol, we need to use methods from XIManagementInterface.
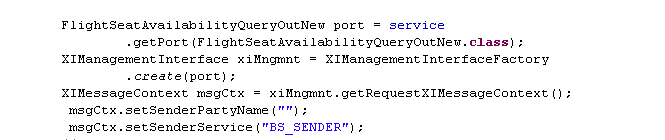
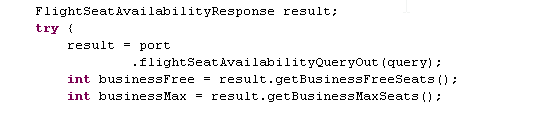
and the actual proxy call to get the result.
We have set the business system programmatically. It’s also possible to not set it here and instead set Party and Sender Service in configuration for Java proxies ( this appears once the project is deployed ) in Port Configuration.
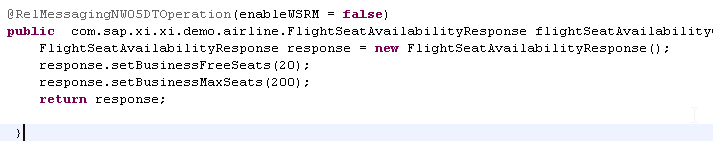
Inbound Service Implementation
For the inbound service implementation, we’ll need to add @XIEnabled annotation and it’ll need @TransportBindingRT as well. Add @XIEnabled and IDE will help with @TransportBindingRT as they’re required together.

Project Deployment
Our EAR has our EJB as well as dynamic web project.Deploy the EAR .

Service verification in NWA
Once the project is successfully deployed, we should be able to find our consumer proxy . This was actually confusing for me. I tried to deploy the generated client without the actual service call in servlet and it never worked for me. Only when I created the servlet making the outbound call I could see the outbound proxy. It’s best to finish outbound proxy and inbound service implementation along with consumer application ( servlet in this case ) and then try to deploy them in one shot.
Below is the screenshot of the port configuration . We can set the party/ business system here if it’s not set programmatically.
Similarly, the inbound service shows up as well in Service Definitions.
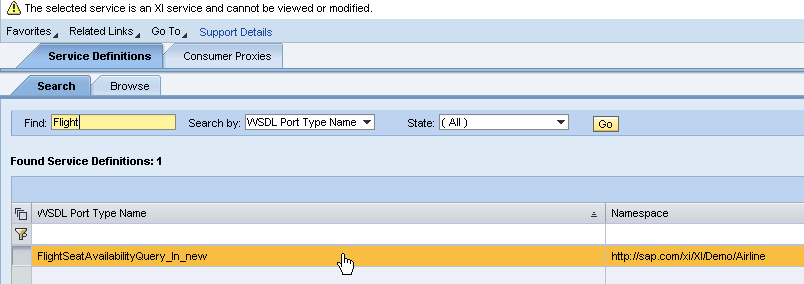
Our development is done. Now, we need to create an integration flow with the required sender / receiver interface values.
Sender communication channel uses XI message protocol for a SOAP adapter and HTTP as the transport protocol.

Similarly, create a receiver communication channel of type SOAP, using HTTP as transport protocol and XI as message protocol.

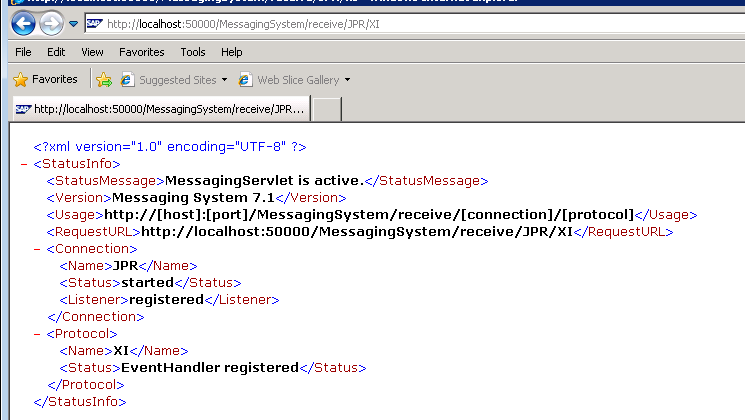
Path prefix for sending proxy messages bia JPR is /MessagingSystem/receive/JPR/XI.
Do a test with the URL going to be used on the receiving side to verify it’s running.
Now, configure the receiver communication channel. Change the authentication mode to “Use logon data to no-SAP system’ and provide
authentication credentials.

Activate the iFLow and we’re ready to test the set up.
Testing
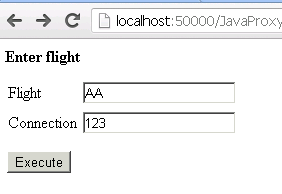
Fire the servlet and it should come up with the below screen
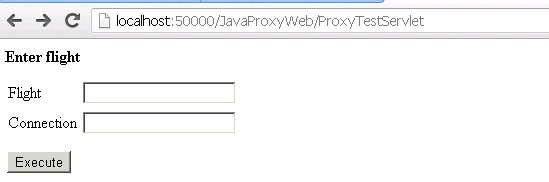
Put your flight and connection details. We aren’t really using the date and hence it’s not in screen.
And if everything goes well, we should get the below screen.
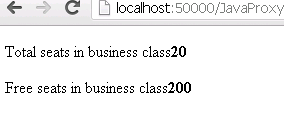
Voila ! Our proxy worked and it has come back with the response.
This matches with our service implementation – we’re just returning 20 free and 200 max business class seats .
The message can be displayed in RWB / PIMON.

The audit log confirms that JPR has successfully delivered the message along with the response message.

The source code is available on https://github.com/viksingh/PIJavaProxy . I’ve just put the outbound proxy call in the servlet and the inbound service implementation as these are the two files we need to modify. Rest all were left standard including deployment descriptors.
Debugging Java applications on SAP PI/PO
Posted: February 1, 2014 Filed under: SAP, SAP Java | Tags: java, SAP PI, SAP PO Leave a commentFrom my post on SCN – http://scn.sap.com/community/pi-and-soa-middleware/blog/2014/01/25/debugging-java-applications-java-mapping-java-proxies-etc-on-sap-pipo
Below are the steps to debug any Java application on SAP PI/PO – they are generic for SAP AS Java server .It can be used to debug Java mappings, Java proxy calls in PI etc.
-Log on to SAP management console and click on developer trace. There is documentation of SAP AS Java ports here.
http://help.sap.com/saphelp_nwpi71/helpdata/en/a2/f9d7fed2adc340ab462ae159d19509/content.htm
However, it’s easiest to just look at the Developer Trace and get the port number. You may need to ask Basis to supply this information as it requires access to SAP management console.
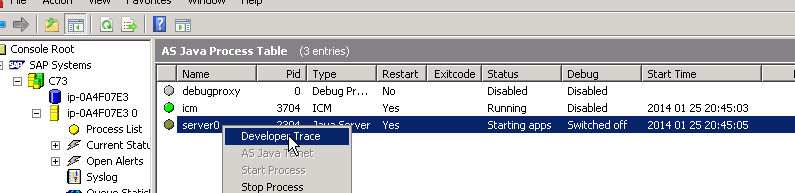
– In this case, the debugging port is 50021 .
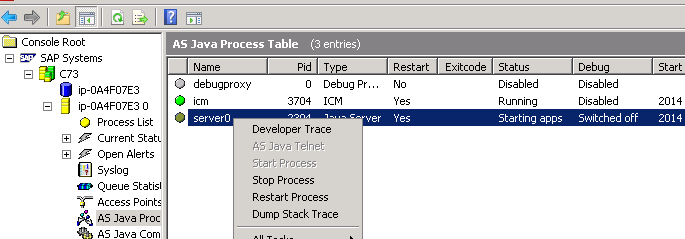
– From SAP management console, enable debugging.

-The port number can also be verified by looking at debugging “Switched on (50021)” column.
– To debug the application, create a debug configuration in NWDS. It can be selected from Run -> Debug Configurations.
Use ‘Remote Java Application’ as the application type.


-Create the configuration specifying the project name and click on Debug.

– This launches the debug mode.Confirm to use the debug mode.
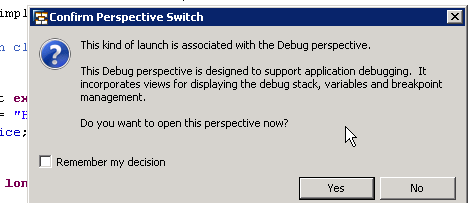
– We’re ready to start debugging the Java code.
The code can be any Java object :
– I tested with SAP PI Java mapping – in this case you have to let the map execute by processing a message.
– This example is a SAP Java proxy I was testing and had issues in figuring out the error. Hence, I created a simple Servlet which fires a message.

and the Servlet can be executed allowing us to debug any J2EE application component.


I hope it’s useful for SAP PI developers as especially with single Java stack, there are going to be more Java objects created and being able to debug is efficient.
Furthermore, in PI Java mappings sometimes we need the actual data and environment to test the application and making a dummy call from main to call transform / execute can’t doesn’t provide the information. An instance of this could be a JDBC call to read a PI table.
