Some tips and tricks for adapter modules lifecycle management
Posted: January 25, 2015 Filed under: Uncategorized Leave a commentFrom my SCN blog : http://scn.sap.com/community/pi-and-soa-middleware/blog/2015/01/25/some-tips-and-tricks-for-adapter-modules-lifecycle-management
Recently I was involved in migrating lot of adapter modules from a PI 7.0 system to a PI 7.4 environment. Creating a custom adapter module is not too complicated but like anything else, we need to be clear of all the components involved and their implications. There is a very good SDN document about the steps to create one. However, in my experience keeping the following points i makes the development process much smoother.
1. Understanding the descriptor files:
Most of the issues with adapter modules occur as one of the descriptors is wrong. Let’s go through them.
a) ejb-j2ee-engine.xml: This file will be in the EJB project. This links the EJB name with the JNDI name. Hence, if you are getting a module not found error, most likely you need to check your jndi-name.
<?xml version=”1.0″ encoding=”UTF-8″ standalone=”no”?>
<ejb-j2ee-engine
xmlns:xsi=”http://www.w3.org/2001/XMLSchema-instance“
xsi:noNamespaceSchemaLocation=”ejb-j2ee-engine.xsd”>
<enterprise-beans>
<enterprise-bean>
<ejb-name>ToUpperCase</ejb-name>
<jndi-name>ToUpperCase</jndi-name>
</enterprise-bean>
</enterprise-beans>
</ejb-j2ee-engine>
b) ejb-jar.xml : This is in the EJB project as well . This has the actual class name, EJB interface names, bean type etc. The key thing here is to check the ejb-name and the class name. The home,local, remote and local-home names always stay the same.( to standard SAP values ). This causes a lot of errors as normally people just accept the default provided names for these interfaces and it causes errors.
| <?xml version=“1.0“ encoding=“UTF-8“?> | |
| <ejb-jar xmlns=“http://java.sun.com/xml/ns/j2ee“xmlns:xsi=“http://www.w3.org/2001/XMLSchema-instance“ id=“ejb-jar_ID“ version=“2.1“xsi:schemaLocation=“http://java.sun.com/xml/ns/j2ee http://java.sun.com/xml/ns/j2ee/ejb-jar_2_1.xsd“> | |
| <enterprise-beans> | |
| <session> | |
| <icon/> | |
| <ejb-name>ToUpperCase</ejb-name> | |
| <home>com.sap.aii.af.lib.mp.module.ModuleHome</home> | |
| <remote>com.sap.aii.af.lib.mp.module.ModuleRemote</remote> | |
| <local-home>com.sap.aii.af.lib.mp.module.ModuleLocalHome</local-home> | |
| <local>com.sap.aii.af.lib.mp.module.ModuleLocal</local> | |
| <ejb-class>com.demo.ToUpperCasebean</ejb-class> | |
| <session-type>Stateless</session-type> | |
| <transaction-type>Container</transaction-type> | |
| </session> | |
| </enterprise-beans> | |
| </ejb-jar> |
c) application-j2ee-engine.xml : This file is in the EAR project and stays the same, unless the project needs additional libraries.
<?xml version=”1.0″ encoding=”UTF-8″ standalone=”no”?>
<application-j2ee-engine
xmlns:xsi=”http://www.w3.org/2001/XMLSchema-instance”
xsi:noNamespaceSchemaLocation=”application-j2ee-engine.xsd”>
<reference
reference-type=”hard”>
<reference-target
provider-name=”sap.com”
target-type=”service”>engine.security.facade</reference-target>
</reference>
<reference
reference-type=”hard”>
<reference-target
provider-name=”sap.com”
target-type=”library”>engine.j2ee14.facade</reference-target>
</reference>
<reference
reference-type=”hard”>
<reference-target
provider-name=”sap.com”
target-type=”service”>com.sap.aii.af.svc.facade</reference-target>
</reference>
<reference
reference-type=”hard”>
<reference-target
provider-name=”sap.com”
target-type=”interface”>com.sap.aii.af.ifc.facade</reference-target>
</reference>
<reference
reference-type=”hard”>
<reference-target
provider-name=”sap.com”
target-type=”library”>com.sap.aii.af.lib.facade</reference-target>
</reference>
<reference
reference-type=”hard”>
<reference-target
provider-name=”sap.com”
target-type=”library”>com.sap.base.technology.facade</reference-target>
</reference>
<provider-name>sap.com</provider-name>
<fail-over-enable
mode=”disable”
xsi:type=”fail-over-enableType_disable”/>
</application-j2ee-engine>
This file has references of libraries etc. when the application is running. A good way to check that the references are correct is by going to Java Class Loader on the application server and give the component name.
In the below screen-shot we’re able to fins component type “service” with name “engine.security.facade” as updated in application-j2ee-engine.xml .

Addiing additional references: If we’re using additional libraries, we need to update the reference in the below way.
– Add the client libraries to allow compilation. Many of the libraries are already available in NWDS plugins ( e.g. JCO 2/3 libraries ). However, in some cases they will need to be obtained from SAP PI application server.
– Refer Javadoc to understand the DC that contains the class. Taking interface ApplicationPropertiesAccess as an example. Javadoc at
gives the DC as:
[sap.com] tc/je/appconfiguration/api

Hence, the deployment descriptor will need to be updated as:
<reference reference-type=”hard”>
<reference-target provider-name=”sap.com”
target-type=”service“>
tc~je~appconfiguration~api
</reference-target>
</reference>
2. Renaming adapter module name: We need to update a module name many a times. Some of the reasons could be:
– While testing, we gave a “test” name and want to change the module name without rewriting the whole project.
– Create a new version and test it out in some scenarios before changing configuration everywhere.
The adapter module name that we configure in adapter modules is actually the JNDI name in ejb-j2ee-engine.xml. So initially the ejb and jndi names were the same.

In the below screenshot, I changed the JNDI name to Convert2Up

After making only the JNDI name, I sent a test message after updating the adapter module config parameters and it works fine.

3. Adding software component information: The adapter module can be deployed directly from NWDS by running the EAR project on the application server. However, it is better to organise custom software components like SAP delivered software components in its own namespace so that it’s easier to track the inventory and get all the benefits of application lifecycle management.
Without the software component information, we can verify the bean is successfully deployed by checking JNDI browser.

However, if there are multiple beans, we need to know their names. It’s better to organise in their own namespace. We need to go through the below process : EAR –> SDA –> SCA
The steps required are :
– Convert EAR to SDA file ( which is EAR file along with SAP specific manifest info in SAP_MANIFEST.MF file )
– Add SDA file to a SCA file along with the software component information
The easiest approach is to use nwpacktool . Update the batch file with JAVA_HOME and NWPACKTOOLLIB.

Then lanuch the batch ( or .sh ) file. As an example, to create a SDA file from the EAR.

Now, add component information and create a SCA file.

Now, deploy the SCA file . We can display all custom modules created under the same component.In the below screen-shot, two beans are deployed under SC “AdaptModules” with the first bean having version 3.
 ,
,
It’s easier to deploy to any system as well since there is only one SCA file to be updated .
Storing password in SAP PI modules
Posted: January 21, 2015 Filed under: Uncategorized Leave a commentFrom my SCN blog : http://scn.sap.com/community/pi-and-soa-middleware/blog/2015/01/21/storing-password-in-sap-pi-modules
Storing password in SAP PI modules.
Setting user and password inside a module is slightly different from normal adapter module parameters as the text can’t be kept in clear-text in module parameters.
Three strategies we can use:
1) Use hard-coded user id and password in the module. Not a great approach but sometimes this can be the only feasible option. The advantage of course is that there is no risk of locking the user.
2) Setting in comm channel as a secure parameter ( displayed as asterisk ).
Here, user can be set as a normal string parameter. For passwords, we don’t want the password to show up in clear text. Hence, password can be the following:
- – If password parameter starts with pwd, it’s displayed as asterisks when entered and displayed. However, the database folder is unencrypted.
- – If password parameter starts with cryptedpassword, the database folder is encrypted. This is more secure as the database folder is encrypted.
The advantage is that the values can be configured for each system and the drawback being if the password is not correctly entered it can get locked and trying to find the comm channel which is locking the user can be time consuming.
3) Setting values in Application Properties. This combines the best of both worlds – we’re able to configure values in each environment and as we’re configuring it in only one location, the chances of accidentally locking the user due to incorrect values is reduced.
The values can be modified from NWA. The path is:

Configuration Management->Infrastructure->Java System Properties
Steps required to add configuration capacity.
a) Add sap.com~tc~je~configuration~impl.jar to the module EJB project.
Path to get the client library: /usr/sap/<SID>/<instance>/j2ee/cluster/bin/services/configuration/lib/private/sap.com~tc~je~configuration~impl.jar
b) Create sap.application.global.properties file under META-INF. It’s essentially a .properties file.

Sample content to make User modifiable and appear as clear text
## Comment for user
#? secure = false; onlinemodifiable = true
#% type = STRING;
User =
Sample content to make User modifiable and appear as asterisk when entering in NWA.
## Comment for password
#? secure = true; onlinemodifiable = true
#% type = STRING;
Password =
c) Update module code to read the property
Sample code will look something like this ( to be added in the module code )
// Obtain the JNDI context
InitialContext ctx = new InitialContext();
// access the Application-Configuration-Façade service
ApplicationPropertiesAccess appCfgProps = (ApplicationPropertiesAccess) ctx.lookup(“ApplicationConfiguration”);
java.util.Properties appProps = appCfgProps.
if (appProps == null) {
// perform error handling
}
else
{
userID = appProps.getProperty(“
password = appProps.getProperty(“Password”);
}
d) Update application deployment descriptor to indicate the library being used. Add this to application-j2ee-engine.xml .
<reference reference-type=”hard”>
<reference-target provider-name=”sap.com”
target-type=”service”>
tc~je~appconfiguration~api
</reference-target>
</reference>
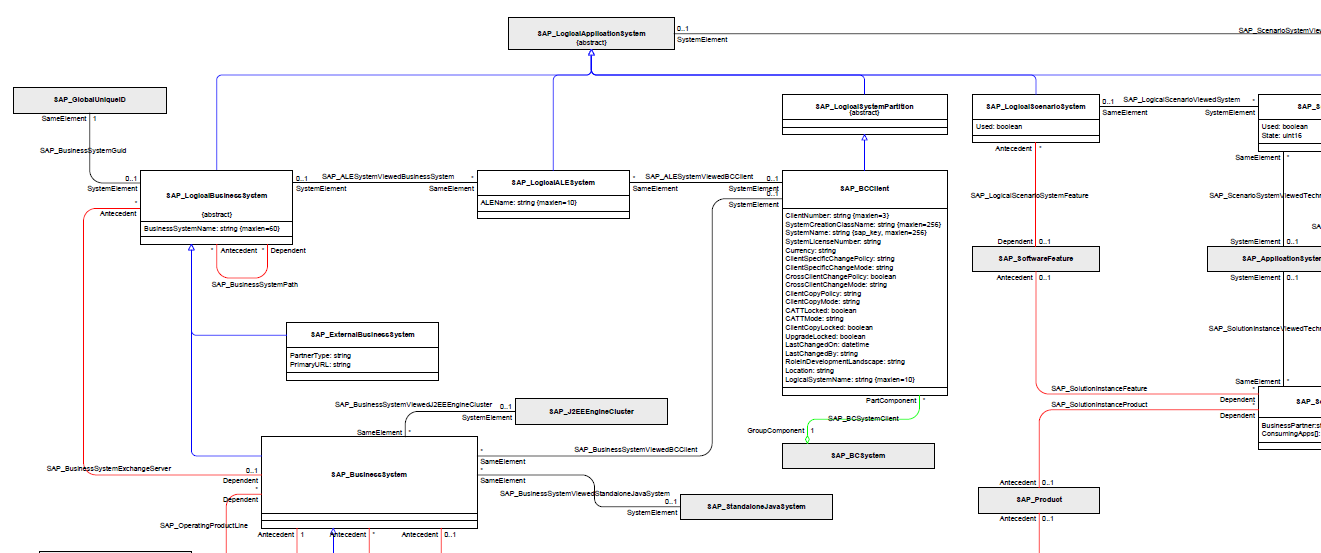
Understanding SLD API for mass creation of business systems / other SLD objects
Posted: November 6, 2014 Filed under: Uncategorized Leave a commentFrom my blog on SCN: