Understanding CSV files and their handling in ABAP
Posted: September 10, 2014 Filed under: SAP, SAP ABAP Leave a commentFrom my blog on SCN
http://scn.sap.com/community/abap/blog/2014/09/09/understanding-csv-files-and-their-handling-in-abap
Retain selection screen values on program restart for transactions with chosen selections
Posted: August 20, 2014 Filed under: SAP, SAP ABAP | Tags: SAP, SAP ABAP Leave a commentFrom my blog on SCN
I had an interesting last week and what looked easy at the outset did my head in for quite a while. I tried various methods and the below approach was able to give me a satisfactory solution.
Let’s have a look at the high level requirement.
– Copy a standard SAP transaction and customise it . Below picture describes the requirement

The transaction is started with only few fields of the complete selection screen as the selection screen has too many fields and may confuse the users.

The users need to navigate back and forth between different modes of output screen. At the first display of output screen ( let’s call them as levels – so the output screen is at level 0 when initially displayed and if called again goes to level 1 and so on . Similarly when the user comes back from a higher level of screen, the level will decrease : from 1 to 0 ). And of course when the program navigates back from level 0 of selection screen, it should display the selection screen.
I prototyped using a simple program using flight model.
– Selection Screen : Contains all fields.

However, the transaction is always run with a variant which hides the last field.

– Let’s test with some data.

We get the level 0 output screen.

Now click on filter ( search icon on top right )

and we get level 1 screen.

Looks good so far. Now, let’s try going back – going back to level 0 gives the screen as anticipated. However, when we go back and see that the selection screen parameters have gone back. The selection screen has gone blank !

Let’s see what’s going on.
As we need to keep track of different levels of screen, if the level of screen is greater than 0.
…….
ELSEIF sy–ucomm = ‘EXIT’.
IF gv_list_level > 0.
gv_list_level = gv_list_level – 1.
gt_flight[] = gt_master_flight[].
CALL SCREEN 100.
ENDIF.
When we want to go back to selection screen from screen at level 0, we use below:
SUBMIT zsubmit_flight
WITH report EQ ‘ZTESTFLIGHT’
WITH variant = ‘ZFLIGHT_VAR’
WITH SELECTION-TABLE gt_seltab .
zsubmit_flight is a standard SAP report used by the report and can’t be changed by us.
SUBMIT (REPORT) WITH VARIANT = VARIANT
USING SELECTION–SET VARIANT
VIA SELECTION-SCREEN
Workaround:
1) Store selected values by call of RS_REFRESH_FROM_SELECTOPTIONS
2) Export the selection table before doing a program restart.
EXPORT gt_seltab TO MEMORY ID gc_sel_mem.
3) Retrieve the selection table AT SELECTION-SCREEN OUTPUT.
RS_VARIANT_CONTENTS gives the parameters and select-options actually visible in the variant.
IMPORT gt_seltab FROM MEMORY ID gc_sel_mem.
IF NOT gt_seltab[] IS INITIAL.
CALL FUNCTION ‘RS_VARIANT_CONTENTS’
EXPORTING
report = ‘ZTESTFLIGHT’
variant = ‘ZFLIGHT_VAR’
TABLES
l_params = lt_params
l_selop = lt_selops
valutab = lt_value
EXCEPTIONS
variant_non_existent = 1
variant_obsolete = 2
OTHERS = 3.
IF sy–subrc <> 0.
clear: lt_value,
lt_selops,
lt_value.
ENDIF.
* Update parameters values
LOOP AT lt_params INTO lw_param.
READ TABLE gt_seltab REFERENCE INTO lo_values WITH KEY selname = lw_param–name.
IF sy–subrc = 0.
lv_attr = lo_values->selname.
TRANSLATE lv_attr TO UPPER CASE.
ASSIGN (lv_attr) TO <fs_attr_val>.
<fs_attr_val> = lo_values->low.
ENDIF.
ENDLOOP.
* Update select-option values
LOOP AT lt_selops INTO lw_param.
READ TABLE gt_seltab REFERENCE INTO lo_values WITH KEY selname = lw_param–name.
IF sy–subrc = 0.
CONCATENATE lo_values->selname ‘SIGN’ INTO lv_attr SEPARATED BY ‘-‘.
TRANSLATE lv_attr TO UPPER CASE.
ASSIGN (lv_attr) TO <fs_attr_sign>.
<fs_attr_sign> = lo_values->sign.
CONCATENATE lo_values->selname ‘OPTION’ INTO lv_attr SEPARATED BY ‘-‘.
TRANSLATE lv_attr TO UPPER CASE.
ASSIGN (lv_attr) TO <fs_attr_option>.
<fs_attr_option> = lo_values->option.
CONCATENATE lo_values->selname ‘LOW’ INTO lv_attr SEPARATED BY ‘-‘.
TRANSLATE lv_attr TO UPPER CASE.
ASSIGN (lv_attr) TO <fs_attr_low>.
<fs_attr_low> = lo_values->low.
CONCATENATE lo_values->selname ‘HIGH’ INTO lv_attr SEPARATED BY ‘-‘.
TRANSLATE lv_attr TO UPPER CASE.
ASSIGN (lv_attr) TO <fs_attr_high>.
<fs_attr_high> = lo_values->high.
lv_attr = lo_values->selname.
TRANSLATE lv_attr TO UPPER CASE.
ASSIGN (lv_attr) TO <fs_attr_main>.
CONCATENATE lv_attr ‘[]’ INTO lv_attr_tab.
ASSIGN (lv_attr_tab) TO <fs_attr_tab>.
IF lo_values->low IS NOT INITIAL OR lo_values->high IS NOT INITIAL.
REFRESH <fs_attr_tab>.
APPEND <fs_attr_main> TO <fs_attr_tab>.
ENDIF.
ENDIF.
ENDLOOP.
ENDIF.
– Create a transaction ‘ZFLIGHT’ with program ZTESTFLIGHT , variant ZFLIGHT_VAR.
The code can be referred here:
The code can be referred here:
ZSUBMIT_FLIGHT
https://github.com/viksingh/ABAP_Demo/blob/master/ZSUBMIT_FLIGHT
Program ZTESTFLIGHT with issues:
https://github.com/viksingh/ABAP_Demo/blob/master/ZTESTFLIGHT_1
Program ZTESTFLIGHT with corrections:
ABAP_Demo/ZTESTFLIGHT_2 at master · viksingh/ABAP_Demo · GitHub
The key here is function module RS_VARIANT_CONTENTS and the dynamic update of selection screen after restart of a transaction.
ABAP dynamic internal table sort saves the day
Posted: August 16, 2014 Filed under: SAP, SAP ABAP Leave a commentRequirement to refresh the ALV to display only display unique fields. Thankfully the sort fields of an itab can be specified dynamically now.
TRY.
SORT gt_output BY (lt_sorttab).
DELETE ADJACENT DUPLICATES FROM gt_output COMPARING ALL FIELDS.
CATCH cx_sy_dyn_table_ill_comp_val.
gt_output[] = lt_output[].
ENDTRY.
Understanding and updating MIGO defaults in ABAP
Posted: July 29, 2014 Filed under: SAP, SAP ABAP Leave a commentPosted on SCN at http://scn.sap.com/community/abap/blog/2014/07/28/understanding-and-modifying-migos-defaults-programmatically.
Recently I had a situation where I needed to update MIGOs defaults programatically. I tried to search for a solution but couldn’t see it mentioned anywhere and hence decided to write it down . I hope that it’ll be useful for anyone in a similar situation.
Background:
MIGO is a multi-purpose transaction which can be used for various activities in material management – performing goods movements, receipt of purchase order etc. It replaces many older transactions . There are others as well but to list down a few:
- Post a goods receipt to a known purchase order (transaction MB01)
- Change a material document from goods receipts (transaction MB02)
- Display a material document from goods receipts (transaction MB03)
- Cancel a material document from goods receipts (transaction MBST)
To understand why we may need to ever need to modify MIGO defaults, consider the below situation.
– A file arrives for processing in SAP ( say as a batch job ) .
– Initial goods movement is tried using a BAPI. If the processing fails , a user SM35 BDC session is created for processing which can be reprocessed by users ( the users are familiar with MIGO ). A custom transaction for reprocessing is created as the users couldn’t be given access to SM35. SM35 allows you to display and potentially reprocess all sessions which can be tricky if the authorisations are a bit leaky.

The failed sessions can then be processed by a custom transaction – the SM35 sessions are persisted to a temporary table to be used by reprocessing transaction.
Problem:
Everything looks good in theory : all automatic postings are done in background and any errors can be handled by the custom transaction. However, while the user is performing the reprocessing the MIGO session, something interesting happens – if the user opens a parallel MIGO session and performs some other processing in parallel, the subsequent sessions start to fail in the custom transaction. Users could be processing multiple sessions sequentially and might go away and do some other movements in parallel in MIGO.

Why does this happen ?
MIGO stores user’s defaults trying to optimise the usage so that the user doesn’t have to set the selections – this causes the defaults to be always set whenever you use the transaction. The parallel session which the user opened has overridden the defaults and as a result, subsequent failed sessions have different default values set in the screen even though the BDC recording used in SM35 session was set correctly. User defaults is overriding BDC set values .
Looking at the below image, the BDC session has set values A07 and R10 for action and sub-selection within action.

However, if the user choses something else in a parallel session ( say A05 and a sub-selection ) , it overrides the action default and subsequent SM35 sessions start failing as then MIGO will start with A05 / sub-selection.
Solution:
MIGO stores user’s defaults in table ESDUS and these defaults correspond to MIGO_FIRSTLINE action. Seeing the below table entries, the settings for the user are:
Default is action = A07
and sub-selection for A07 is R10.
Hence, A07 / R10 will appear for ACTION and sub-selection ( as shown in above image ) .

Show Me The Code:
Now, we know where they’re stored, how to update them ?
Class CL_MMIM_USERDEFAULTS can be used to read and update the parameters. It’s a singleton and hence there should be only instance at a given time. Consequently, if we’re using it we have to ensure the instance is destroyed . This is achieved by FLUSH_ALL method of the class. Above methods are self explanatory and the constructor requires ACTION value.

So I did the following:
– Instantiate the class using ACTION as “MIGO_FIRSTLINE” and set the instance values.
– Set the values:
o_migo_defaults->set
( i_element = ‘ACTION’
i_active = lv_action ).
– Flush the value to dB and destroy the instance
o_migo_defaults->flush( ). “Save values to dB
o_migo_defaults->flush_all( ). “Destroy this instance as others instance will start producing errors
The table has other values used in MIGO defaults ( e.g. default movement type for an action ) and can be similarly updated.
SAP HANA CDS ( Core Data Services )
Posted: February 24, 2014 Filed under: HANA, SAP, SAP ABAP | Tags: ABAP, HANA, SAP Leave a commentWith SAP HANA platform, there has been a major shift in the way database is looked at. Traditionally, ABAP developers brought most of the data back to application server and manipulated based forming the core logic of the application.With HANA, the emphasis has been to do more in the databse ( akka code pushdown ).
However, there are some major drawbacks:
– It relies on development in two areas : HANA views / procedures which are then consumed in ABAP.
– Two separate mechanisms for ALM with ABAP and HANA transports.
With SAP NW 7.4 SP5, ABAP open SQL has been enhanced and views can be created using DDL. This is known as CDS ( Core Data Services ) .
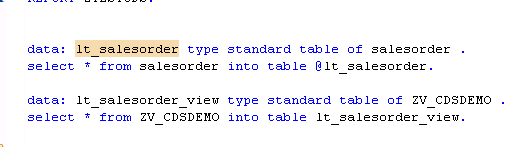
Looking at an example: Create a basic view.
And the view can be consumed in ABAP – Need to add @ annotation .
These can be extended so that if DDIC additions are made, the view gets them automatically.
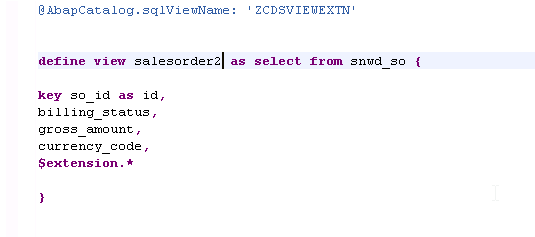
And the views can be made more complex.

and even more complex.

This to me looks like a step in the right direction as:
– it’s open SQL and hence is dB agnostic. Hence, it can be supported for other vendors databases in future.
– No separate development done in HANA reducing complexity of application development
ABAP Object Services: Some useful additions
Posted: February 9, 2014 Filed under: HANA, SAP, SAP ABAP | Tags: HANA, SAP, SAP ABAP Leave a commentFrom my SCN blog : http://scn.sap.com/community/abap/blog/2014/02/09/abap-object-services-some-useful-additions-to-persistent-and-transient-objects
All modern programming language environments have some kind of ORM ( Object Relationship Mechanism ) mechanism. It allows persistence to be represented as programming language objects. In ABAP object services, we have persistent objects to hold data which we’ll save to database and transient objects to hold data in ABAP memory temporarily.
This blog summarizes my experiences in the additions I had to make while using object services in ABAP.
– In the points 1 and 2, I describe two features I wasn’t aware of but found them based on requirements.
– The last three examples under point 3 are enhanced methods I had to create using RTTI as they’re not created “out of box” by persistent generator mechanism – they’re not strictly persistence but I found myself wishing them with my persistent objects.
Just to recap about persistent objects, we can get a persistence reference and set values later. So in the below example, lo_flight is a persistent object and we can update price.
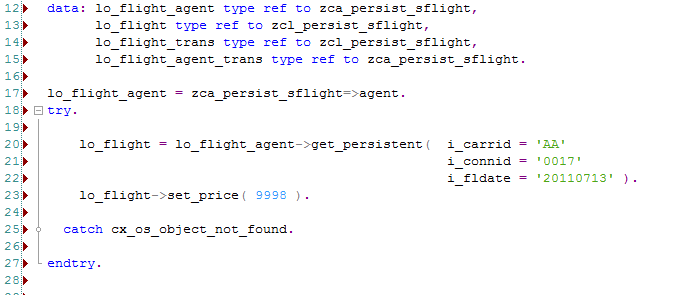
Below are the additions I had to make to get object services working efficiently in my own experience.
- Adding extra ( non-persistent ) fields to a persistent object : What if we need an attribute on the persistent objects not part of the underlying database table. These can be added as an attribute .

And then will show up as an attribute in the “Persistence Representant” view. As seen below, the attribute gets added .


The field gets added as a normal attribute to the class and can be removed (attributes coming from the table can’t be removed as they’re greyed out ).
As an example, I had to identify if a peristent object has been changed and I added an extra field ‘update’ for this purpose.
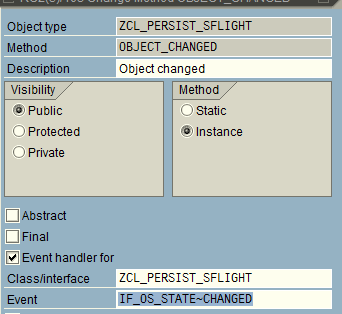
and then tie this attribute with the event IF_OS_STATE~CHANGED to indicate when the object has been modified.
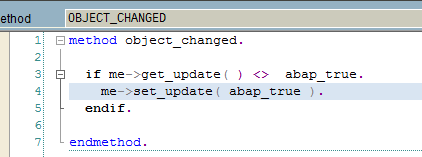
This can be handy if a transient object is converted into a persistent object . e.g. A screen’s PBO gets the transient object and the PAI can check if the object has been modified to trigger the conversion from a transient object to a persistent object.
2. Transient objects in place of ABAP memory: Using transient objects for structures to store memory within a session (as a replacement for ABAP Memory). Many a times, to transfer data with in a session, we export data into ABAP memory and then import it back again. This is fine but this can be difficult to debug in case the export / import locations are not well documented ( imagine data being exported to ABAP memory from an enhancement deep down in a stack and then trying to debug through to find why it’s not set).
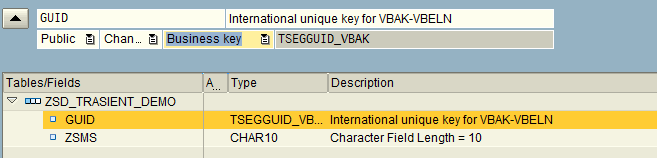
A substitute can be to create transient objects from structures.
And we can create a business key which can hold distinct values.
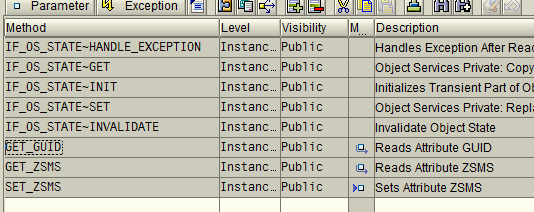
Looking at the method definitions.
We can create a transient object.

and then retrieve the values.
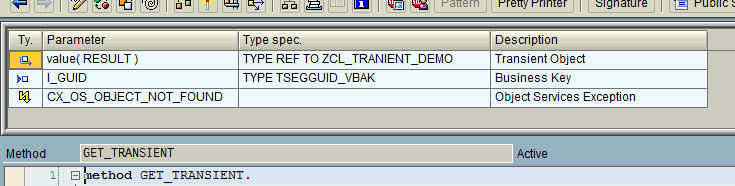
However, if the CREATE_TRANSIENT and GET_TRANSIENT are not in the same stack , this will fail . e.g. if the GET_TRANSIENT was called in a V1/V2 update process whereas the CREATE_TRANSIENT was in the main process, GET_TRANSIENT will fail.The below diagram represents it diagrammatically.

We still need to use SAP memory but at-least we can replace ABAP memory export / import calls by TRANSIENT objects.
3. Enhanced methods in persistence classes: The last three enhancements are based on addition of new methods to persistent classes. Like regular classes, methods can be added to them and are retained even with regeneration due to data dictionary modifications.
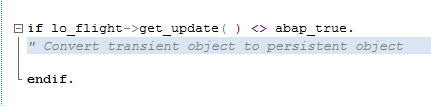
a) “Persist” transient objects: Converting transient objects into persistent objects: In point 1, if the object was modified, I was converting the transient object into a persistent one.
It is handy to be able to save a transient object into a persistent one. E.g. duing PBO of a screen, a transient object was created to read attributes and if attributes are modified, the save can be triggered by converting transient objects into persistent objects.
The below method can be called over the attributes we’re interested in persisting .
data: ls_method type seocmpname,
* ls_class type seoclsname,
lt_params type abap_parmbind_tab,
ls_param type abap_parmbind,
dref type ref to data,
lo_excep type ref to cx_sy_dyn_call_error, “#EC NEEDED
ls_par type abap_parmname.
field-symbols: <fs_attr_value> type any.
* To call the dynamic set_* methods, we need to populate kind, name and ref to actual value
* Create the dynamic method name : SET_<attribute>
concatenate ‘set_’ im_attr into ls_method.
translate ls_method to upper case. “#EC TRANSLANG
* Populate ref to data value
create data dref type (im_data_element).
assign dref->* to <fs_attr_value> .
<fs_attr_value> = im_attr_val .
ls_param-value = dref.
*We’re only setting values => param type is exporting
ls_param-kind = cl_abap_objectdescr=>exporting.
* Create the dynamic param name to be passed
concatenate ‘i_’ im_attr into ls_par.
translate ls_par to upper case.
ls_param-name = ls_par.
insert ls_param into table lt_params .
* Call the dynamic method
try.
call method me->(ls_method)
parameter-table
lt_params.
catch cx_sy_dyn_call_error into lo_excep.
raise exception type zcx_test_update
exporting textid = zcx_test_update=>dynamic_method_call_error .
endtry.
b) Convert persistent objects to structure : Sometimes we need to get the structure of persistent objects as there are some operations that can’t be done otherwise e.g. value comparison of all fields. It’s required to convert the peristent objects into structures.
DATA: lrf_structdescr TYPE REF TO cl_abap_structdescr,
lv_method_name TYPE seomtdname,
ls_component TYPE abap_compdescr.
FIELD-SYMBOLS: <fs_component> TYPE ANY.
* Request description of transferred structure
lrf_structdescr ?= cl_abap_typedescr=>describe_by_data( ch_struct ).
* Loop via all components of the transferred structure
LOOP AT lrf_structdescr->components INTO ls_component.
* Set the field symbol to the component of the transferred
* structure
ASSIGN COMPONENT ls_component-name OF STRUCTURE ch_surgery
TO <fs_component>.
* Compose the name of the GET method
CONCATENATE ‘GET_’ ls_component-name INTO lv_method_name.
* Determine the value of the attribute via a dynamic call of
* the GET method and write the value to the structure
TRY.
CALL METHOD me->(lv_method_name)
RECEIVING
result = <fs_component>.
CATCH cx_sy_dyn_call_illegal_method.
CONTINUE.
ENDTRY.
ENDLOOP.
c) Convert structures to persistent objects: And we sometimes need to convert the structure back to a persistent object.
RT_TEST is a reference to the persistence object.
DATA: lo_rtti_struc TYPE REF TO cl_abap_structdescr,
lt_field_list TYPE ddfields,
attr TYPE string,
attr1 TYPE string,
attr_val TYPE string.
FIELD-SYMBOLS: <fs_field> TYPE dfies,
<fs_attr_val> TYPE ANY,
<fs_attr_val1> TYPE ANY.
lo_rtti_struc ?= cl_abap_structdescr=>describe_by_name( struct_name ).
lt_field_list = lo_rtti_struc->get_ddic_field_list( ).
LOOP AT lt_field_list ASSIGNING <fs_field>.
CONCATENATE ‘me->’ <fs_field>-fieldname INTO attr .
TRANSLATE attr TO UPPER CASE.
ASSIGN (attr) TO <fs_attr_val>.
IF sy-subrc = 0.
attr_val = <fs_attr_val>.
attr = <fs_field>-fieldname.
CONCATENATE ‘RT_TEST-‘ <fs_field>-fieldname INTO attr1 .
ASSIGN (attr1) TO <fs_attr_val1>.
<fs_attr_val1> = attr_val.
ENDIF.
ENDLOOP.
Installing SAP Trial ( NSP )
Posted: February 2, 2014 Filed under: SAP, SAP ABAP Leave a commentI’ve installed SAP ABAP trial at least a dozen times but keep forgetting some of the points and then end up wasting time trying to set up everything from scratch . I’ll summarize it for future reference as it’s really an easy process.
Software Requirements:
– Get the NSP trial version from SCN . Google it to get the latest version. Currently, the below URL has the link but who knows what’s the link in future. It should be in “SAP NetWeaver Main Releases’ section.
http://www.sdn.sap.com/irj/scn/nw-downloads
– Download SAPGUI installer separately. I tried using the one with the main bundle and it doesn’t work . SAP should just take it out to from the main package to remove any confusion.
– Install a JDK ( I installed JDK1.5, update 22 ) – not sure if a JRE will suffice but just to be sure I installed Java SDK SE 1.5 .
– Install MS Loopback adapter.
-Download WINRAR in advance.
-Chrome ( My favourite browser ). I’m simply not used to IE anymore and end up installing Chrome. WIll be helpful to keep it ready.
– Virtualbox – it’s useful to have the OS running as a VM for 2 reasons:
a) It’s easy to take snapshots at stages to revert to a working stage.
b) It’s easy to clone machines. I’ve got 2 clones now – one with a Win 7 VM which can be used to install anything and one with a functional SAP NSP system.
Software Installation Process:
– Have a fresh win7 installation ready – better use a base VM and clone it .
– It’s automatic to share resources between host and client machines on VMs – Copy all the software files to the client machine. Host is the base OS and by client I mean the one running on a VM.
– Install Winrar and unrar the software files.
– Install Java.
-MSLoopback adapter is already installed.
– Start SAP installation . It’s natural for it to log off and do a login again . I
– It will give some warnings about conditions not being met. They can be ignored.
– The installation took around 8 hours with step 16 ( import ABAP taking a lot of time ) . Hence, don’t panic if it stays there for along time.
– Install SAPGUI and add NSP to logon .
– You start the system from SAP MMC.
– I wasn’t able to modify the system params ( icm/host_name_full ) from RZ10 . So I just changed the file at OS level directly and restarted SAP .
– Ensure that the host name ( FQDN ) has a .com ( or dot<something> ) as ABAP checks it while trying to get the host etc and you’ll get a short dump .
– SAP help lists all the services required to be activated .
– If the system is timing out on you ( as it’s not very powerful ) , you can increase the timeout for HTTP service from transaction SMICM :-> Go To Services -> Chose HTTP and change time etc.
This version is definitely better ( and more stable in installation ) compared to the previous ones . It has never failed on me .It has Gateway though I haven’t really done anything with it yet.
Installing license keys and developer key for BCUSER.
– I removed the existing license keys as the system name is SAP-INTERNAL and the access keys for BCUSER seems to take an issue with it.
– Go to SLICENSE, remove the license keys and install the new one ( chose the first NSP from the license key request page ) .
– Once the license is installed, you can then try to create custom objects and enter key for BCUSER.
Troubleshooting adapter module JCo RFC calls
Posted: February 2, 2014 Filed under: SAP, SAP ABAP, SAP Java, SAP PI/PO | Tags: ABAP, java, SAP, SAP PI Leave a commentFrom my blog on SCN – http://scn.sap.com/community/pi-and-soa-middleware/blog/2013/12/23/troubleshooting-adapter-module-jco-rfc-calls
Many a times we have adapter modules ( AM ) which in turn do a RFC call to ABAP stack of the XI system to retrieve information. This can be handy to make a generic AM that can be plugged in for multiple interfaces.
As an example, if we already have a text file with idoc data in plain text format, the adapter module can be used to convert this data into idoc format. The ABAP stack FM can be created to inquire idoc metadata information in IDX2 and use it to create the idoc structure.

The different steps are as follows:
1.This step shows the data being processed in the module chain. It’s represented in hex format for the message. So, if we have a text file with content “hello” – the message will be “68 65 6c 6c 6f”.
2.The message is entering the module chain. It can be after reading the file for a sender FTP adapter if this is the first module or after another module call e.g. for code page conversion.

3.As part of the adapter module processing, a RFC call is made using Java Connector ( JCo ) with the message and other parameters. These will be adapter module parameters.
4.The returned message is idoc data in hex format of the XML stream.
5.The message is leaving the adapter module.
6.The data is in hex for the idoc. To make it simple, if the idoc data is “<hello>” the message here is “3c 68 65 6c 6c 6f 3e”.
In the above diagram, the module parameters are sent to the RFC function module in text format though the message data will be hex.

Link:http://help.sap.com/saphelp_nw04/helpdata/en/9a/20e23d44d48e5be10000000a114084/content.htm
With all the above theoretical knowledge, let’s create a simple Java program that can aid in troubleshooting.Pre-requisite Libraries to be added to our project:
1. Google Guava :
Get it from here – http://code.google.com/p/guava-libraries/
2. JCO libs
Get it from service marketplace.
3. Create a jar with the property file: I’ve provided a sample property file. It has the details to make us connect to the host, authenticate
Files to be created:
1. Props.properties : to store connection / authentication details so that it’s easy to change the target instead of hardcoding the values in the program.
2. PropHelper.java : Helper class to read properties file.
3. simulateRFCBean: This is the main class – it’s used for reading the file and making the JCo RFC call.
The steps will be:
1.Check the function module for parameters of type IMPORT (or ask your friendly ABAP colleague about the function module.)

This FM requires two parameters:
SOURCE (the message sent as hexadecimal stream).
SNDPRN (This is a just normal text)
The names won’t have to necessarily match as within the module, we map parameter ‘partner’ to ‘SNDPRN’ for the RFC call.
2.Map the data types to Java using the table mentioned above.
Looking at the function module and the data mapping, we’ll need to
a) Convert the file contents to a hexadecimal string ( byte array in Java )
b) Send the sending system as a string ( String in Java )
3.With the above information, it’s straight forward to create the Java program.
a)Read the JCO properties – PropHelper.java is a helper class to help read these properties instead of hardcoding in the program.
b)Read the file to be checked and convert to byte array.
byte[] fileData = Files.toByteArray(new File(“C://temp//bad3.txt”));
– Do the necessary JCO Set up, set the parameters to be supplied for the RFC call
function.getImportParameterList().setValue(“SOURCE”,fileData);
function.getImportParameterList().setValue(“SNDPRN”,”TESTSENDER”);
and finally, make the call.
function.execute(destination)
Now with the set up done, we’re able to replicate the error scenario.
The issue on the communication channel log indicated.
![]()
Using this program, we’re able to replicate the failure.

For debugging on ABAP, an external break-point needs to be set up in the called function module.

Some of the error scenarios we encountered:
- Bad data – new line appearing in the message.
- IDX2 configuration missing for the unique message combination – existing for the basic type and an extension.
However, once we’re able to simulate the failure and debug the issue, finding the resolution is much easier.
Sourcde code link : https://github.com/viksingh/SimulateRFCCalls
Reducing integration effort by leveraging SAP enterprise services part2
Posted: February 1, 2014 Filed under: SAP, SAP ABAP, SAP PI/PO | Tags: SAP ABAP, SAP PI, SAP PO Leave a commentFrom my post on SCN – http://scn.sap.com/community/pi-and-soa-middleware/blog/2013/06/04/reducing-integration-effort-by-leveraging-sap-enterprise-services-part2
This is in continuation of the first blog on reducing integration effort by using SAP enterprise services (http://scn.sap.com/community/pi-and-soa-middleware/blog/2013/06/04/reducing-integration-effort-by-leveraging-sap-enterprise-services )
I’ll describe the steps in more detail here.
Step1. Identify services required.
Go to http://esworkplace.sap.com/ and identify the service required. There’re various ways you can navigate the content. If you’re implementing a new scenario, typically a complete process , you can use integration scenarios ( e.g. agency business ) . Using solution map is higher level ( e.g Sales Order Management ) . Business Scenario Description seems hybrid of the above two and I prefer that. Then, in each bundle you can navigate to the service operation and read through the documentation. Make sure the selected operation is not deprecated. SAP has good documentation around features, configuration required in backend system, error handling and any business function required.
Step2. Identify system set up requirements
Identifying all operations will help to come up with a list of requirements for system set up. It’s relatively straight-forward in PI as we just need to import the software component. However, for the back end system, there can be couple of scenarios:
– Service requiring business function activation (e.g. SAP APPL 6.04 requires LOG_ESOA_OPS_2 activation) .
– Service requiring add-ons to be installed by BASIS in SAINT transaction (e.g. ESA ECC-SE 604 requires BASIS to install ECC-SE add on).
Get the ECC activities organised (as mentioned in part1, some of the business functions are irreversible) and import corresponding PI SWCVs into ESR – these could be downloaded from SMP and imported as usual.
Step3. Check components are completely installed in the system.
Go to transaction SPROXY. If the ECC system satisfies all the pre-requisites and PI has the components as well, the SWCVs should appear in transaction SPROXY.

In SLD, the ECC technical system should have the additions appearing as a software component version in Installed software of the ECC technical system.

Step4. Create custom software component version. This is strictly not required but in experience, there’s always a need to customize messages and hence it should be created with the required service’s SWCVs as the underlying SWCV.

Step5. Test: Once the services are in ECC, you can use them to start doing testing.
Use transaction SPROXY for testing – this should help to identify the elements required in the message to be populated and the business documents processed. In experience, this is where you’ll spend the maximum time trying to identify what is required, where to populate the information etc.
You can test using SOAMANAGER as well but I prefer to just use SPROXY and then when the PI configuration is complete use SOAPUI.
Step6. There will be cases where the standard doesn’t fit the requirement completely. In that case, perform a data type enhancement in SAP PI in the custom namespace.

This should make the data type enhancement show up in ECC SPROXY. Creating the proxy here will update the ECC structures which are used by backend ECC classes for business document processing.

Step7. Some Hints: As usual, testing can be done by configuration in ID and using SOAP UI. Just couple of hints here:
Many of the standard services are sync and ensure that message logging for sync interfaces is on.
The messages appear in SXMB_MONI in ECC only when there’s an error (not application error but more like a system error like configuration, input message not conforming to length / type restrictions etc).
For debugging, you can create a comm channel with your username and turn on HTTP debugging if you’re trying to investigate the SOAP message (say headers).
Step 8: Special case: Lean Order being too Lean !
For one of the scenarios, while creating sales order we realised that lean order doesn’t have the fields we’re interested in. However, there’s a good document on SMP about “Enhancement Options for the Lean Order Interface” and it was very helpful
Step 9: Generate some positive karma – Do some good for people maintaining it later. As the development on ECC side is going to involve mostly enhancements, two things can really be useful.
– Keep all the enhancements in a composite enhancement.
– Create a checkpoint group so that it’s easier to debug messages.
Step 10: Logging in SAP: For synchronous interfaces, SAP does return the proper messages back to the calling application. However, the functional team doesn’t have access / interest to access PI to look at the errors. Hence, we had to build logic to update the messages as an application log (which can be checked in SLG1). This in some ways satisfies their requirement to look at the system to figure out what’s going on.
This is one area where perhaps either I’m missing something or SAP needs to provide information so that users / functional consultants can monitor the messages. Many functional consultants don’t want to even try to look at XML.
A simple class can be created to log the information and call them at appropriate enhancement points. However, we also created a generic method to convert any exception into a BAPI message.
Code can be referenced here.
https://github.com/viksingh/abaputilities/blob/master/exception_to_message_table
Couple of observations where things could potentially by improved by SAP.
– There should be a free tool by SAP to let users/ functional teams monitor messages during testing. I’m aware of AIF but don’t have experience as it’s not free.
– Lack of out of box support for JSON RESTful web service in SAP PI. The initial requirement was to use them but then the source application had to be modified to use CXF to generate SOAP web service calls on the calling application side. I was almost ashamed to go back to the third party
Some of the books & articles I found useful.
SAP Press Book: “Developing Enterprise Services for SAP”: Although I referenced this book only recently, I found an absolute joy to read and did pick up many things. This definitely helped to refine some of the ideas.
http://www.sap-press.com/products/Developing-Enterprise-Services-for-SAP.html
Enterprise Services Enhancement Guide
http://scn.sap.com/docs/DOC-18402
SOA MADE EASY WITH SAP
http://scn.sap.com/docs/DOC-17416
Blog-Add a field to LORD API
Reducing integration effort by leveraging SAP enterprise services part1
Posted: February 1, 2014 Filed under: SAP, SAP ABAP | Tags: SAP ABAP, SAP PI, SAP PO Leave a commentFrom my post on SCN – http://scn.sap.com/community/pi-and-soa-middleware/blog/2013/06/04/reducing-integration-effort-by-leveraging-sap-enterprise-services
The motivation of the blog is a conversation I had with couple of friends. They had implemented a new SAP functionality but were hassled by the amount of effort spent in integration. They eventually completed the task but after lots of crazy hours on late nights and sometimes weekends. As both the integration as well as the functional person is a friend and didn’t know about using enterprise services, I realised that perhaps not everyone is using enterprise services. Further, I was designing and implementing a solution to integrate SAP ECC with an external application for managing distributors and thought to write this post. Our integration required sending master data from SAP and transactional data updates in SAP ECC in OTC / P2P process area triggered from the external application.
Starting with the basics, look at the definition from SAP from BBA guide.
Enterprise Services: Web services using a common enterprise data model based on process components, business objects, and global data types, and following consistent communication patterns. SAP exposes software functionality as enterprise services.
There’s good documentation at http://esworkplace.sap.com/ .
In integration world, I see them as equivalent of classes in application development. If you’re able to use pre-existing content, most of the work is already done for you.
Why to go for enterprise services instead of trying to build them from scratch – what are the practical benefits?
– Leverages pre-built solutions reducing in substantial development effort reductions. We were able to reduce development effort to around 60% of initial estimates and even this is high because of the first time efforts in understanding their architecture and doing some prototyping.
– Easy to extend: Any project will require customization not delivered by standard solution and normally making changes later on is very time-consuming. Most of the functionality is already covered and even if additional changes are required – SAP has given a nice framework to customize them first in PI and then carry out adjustments on SAP system in ABAP stack.
– Comes with a lot of bells and whistles: Have error handling, data validation pre-built.
The following points need to be considered though:
– We utilised various software component versions and there were two mechanisms to get them installed in our landscape.
a) Some require installation of an add-on in ECC requiring BASIS effort (e.g. ECC-SE add-on to be installed by BASIS).
b) Others require activation of irreversible business functions (e.g. ESOA_OPS01 for services in SAP APPL). It’s important to understand that some of the business functions can’t be reversed and hence some amount of regression testing of affected areas need to be performed. SAP provides a test catalogue about the impacted functionality which can help in determining the impact. We tried them first in sandbox. Initially the activation didn’t go smoothly resulting in ABAP dumps which go away on activation. However, it’s painful as you have to wait for a transaction to dump before activating it. After an OSS message, finally we regenerated all programs of EA-APPL, ECC-SE and SAP_APPL software components.
At a very broad level, there are 5 different activities that need to be done.
i ) Identify which services meet requirements completely ( or to the largest possible extent ). There can be more than one service for a given business function ( e.g SalesOrderERPCreateRequestConfirmation_In_V1 and SalesOrderERPCreateRequestConfirmation_In_V2 for sales order creation ). I noticed two things: The former wasn’t able to meet all our requirements and has been deprecated as well. Like any other artefact in software engineering it’s best to avoid deprecated services.
ii) PI configuration: This was straight forward in our case as it was simple SOAP to proxy and reverse.
iii) Back end ABAP adjustments: These were made to fill in organizational data as the third party system doesn’t have concept of some of the organisational structure, data etc.
iv) BASIS activities: Installation of add-ons (e.g. ECC-SE add on via SAINT), regeneration of affected ABAP programs via SGEN.
v) Co-ordination of regression testing: This may involve change management, regression testing and functional owner of the application / process area.
Some of the points we learnt from experience:
– Be ready to spend time in advance of the actual development in prototyping and investigation. However, it pays back in later stages of projects.
– We had to build application logging on ECC side so that in case of errors a functional person knows what to look for.
– There was one instance where we had to overwrite SAP solution. Fortunately, it can always be over-written as a post-exit method in the implementing ABAP class.
– Update some of the system parameters ( e.g. icm/keep_alive_timeout parameter in downstream PI systems). While transporting ESR contents, we realised that the transport import was failing after 5 minutes. These ESR transports with stnadard SAP content can get really big and it’s best to send them in separate transports (for each SWCV) . Our first attempt in trying to import them took 22 minutes in total!
In part2, I’ll describe the steps in more detail to make the implementation process clearer but from our experience, SOA is definitely not dead!
Link to part 2 : http://scn.sap.com/community/pi-and-soa-middleware/blog/2013/06/04/reducing-integration-effort-by-leveraging-sap-enterprise-services-part2
