Job Scheduling on SAP PO ( SAP PI Java stack )
Posted: February 1, 2014 Filed under: SAP, SAP Java | Tags: java, SAP PI, SAP PO Leave a commentFrom my post on SCN : http://scn.sap.com/community/pi-and-soa-middleware/blog/2014/02/01/job-scheduling-on-sap-po-sap-pi-java-stack
Job Scheduling on SAP PO ( SAP PI Java stack )
Scheduled jobs are one of the most common mechanisms to carry out repetitive tasks. In SAP ABAP stack, we have a comprehensive functionality to schedule jobs in SM36/SM37 etc.
With SAP PO being a SAP AS Java system, there is a need schedule jobs to carry out repetitive housekeeping tasks. However, there could sometimes be additional information to be sent out from SAP AS Java system – an example could be custom information from SAP AS Java tables. There’re web services creates by SAP but in some situations they may not be comprehensive enough for our requirements and hence a way needs to be found to send this information out regularly.
The below diagram describes our requirement – the system on left is SAP PI Java stack.
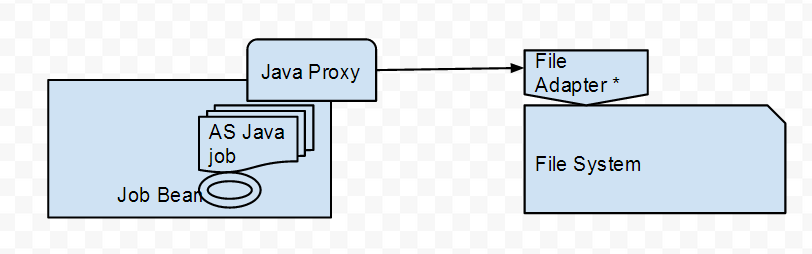
On the receiving side, it can be replaced by a different mechanism – e..g ABAP proxy if sending the information to an ABAP system.
Steps.
1. Generate proxy for outbound interface: The steps are already described in my previous blog.
We’re using asynchronous mechanism in this case .Verify that Interface pattern is Stateless.
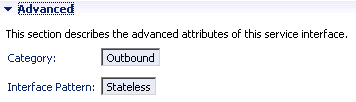
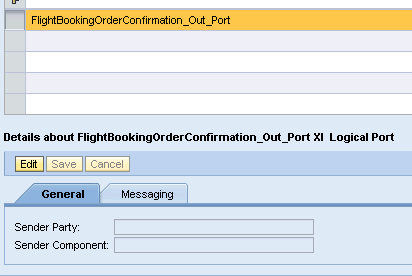
Initially I tried using a service interface with Stateless ( XI 3.0-Comptabible) but the generated proxy won’t have XI logical port .


Where as for FlightBookingOrderConfirmation_Out we get a XI Logical Port.
.
After this step, we have a web and an EAR project.
2. Generate a Job Bean : Create a normal EJB project and then use NWDS options to create a new “scheduler job”.
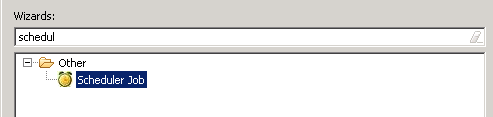
It’ll create an EJB project with a class file to write the logic for our job and extra descriptor files based on values provided in wizard.
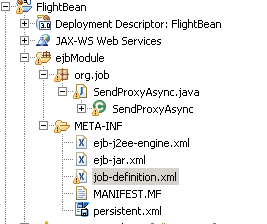
job-definition.xml is a descriptor unique for jobs and holds the job name.

It should match the values generated in the Java file.

Looking at the SendAproxyAsync.java where we implement the job execution logic, add the Proxy Service name.

Main parts of this class:
Logger can be created to log information useful in troubleshooting issues.
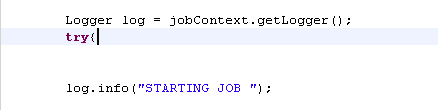
and of course any errors can be logged.
Now, do the usual bit – create XI contect objects, update business data to be sent out and do the outbound proxy call.
Deploy this project.
3. Create an iFlow for this scenario – Nothing too complicated here .We need to create an iFLow for the sender / receiver / interface values. Make sure that the sender communication channel has XI as the message protocol.
4. Set up in NWA:
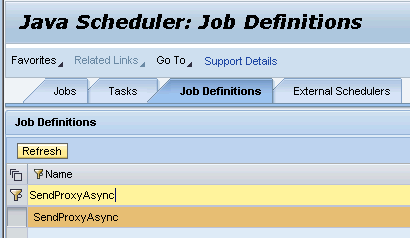
We can look at the job definition in NWA by going to Java Scheduler -> Job Definitions.
As we have already deployed our project, we can see the job definition here.
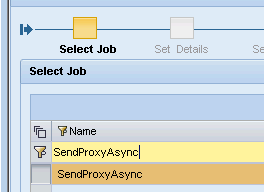
To start executing the job, we need to create a task specifying conditions ( as begin / end time / recurring frequency etc ) .
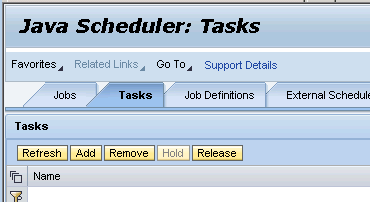
We select our job and complete the wizard – it’s similar to what we’ll give in SM37 on ABAP stack.
After this step, the jobs will start executing at the specified frequency.
5. Testing:
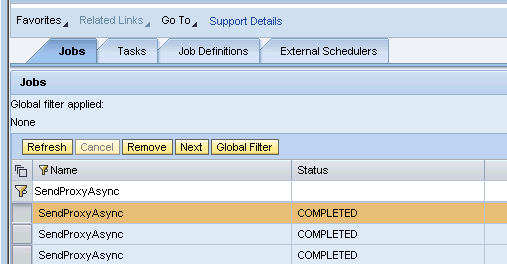
‘’The executed jobs can be checked in the tab “Jobs”.
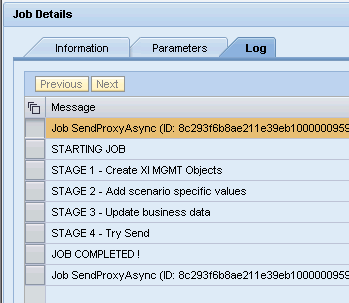
And a log can be displayed with the various messages we have put in the Job Bean – similar to messages on ABAP stack.
Verification : Navigate to PIMON and check messages
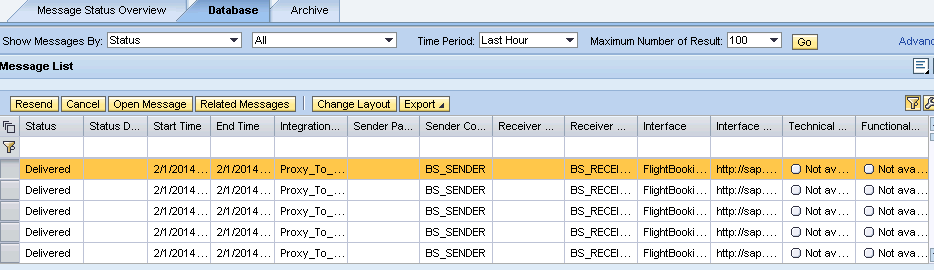
Logs confirm it’s working fine.
The code is at https://github.com/viksingh/PIJavaProxyAsJob . I’ve put the code for only the Java file as others are generated by wizards. For
troubleshooting, looking at system Java logs .
Implementing Sender Receiver Java proxy scenario in SAP PO/PI
Posted: February 1, 2014 Filed under: SAP, SAP Java, SAP PI/PO | Tags: java, SAP PI, SAP PO Leave a commentFrom my post on SCN – http://scn.sap.com/community/pi-and-soa-middleware/blog/2014/01/28/implementing-java-proxy-scenario-on-sap-po
I have been doing some work of late with Java proxies on SAP PO .I tried to use product documentation to understand their working. Product documentation is always the best source of information but things are much clearer for me after I’ve already developed something using a concrete example.
I hope that this post will be useful for anyone trying out SAP PI Java proxies. Here both the sender as well as receiver are Java proxies and it has been implemented on a 7.31 SAP PO system.
Scenario: We’ll use the flight demo model scenario with two Java proxies – interfaces FlightSeatAvailabilityQuery_Out_new for outbound service call and FlightSeatAvailabilityQuery_In_new for inbound service implementation.
Broadly, we’ll have three major objects:
Sender Proxy ( Consumer ) – Being sender, this proxy doesn’t provide any service but is used to make the outbound service call.
Receiver Proxy – It has the actual service implementation .
Servlet ( for testing ) – As the proxy calls are to be in an JEE environment, we’ll create a simple Servlet for testing.
At a high level, the below diagram shows what we’ll end up creating. We’ll need to create a configuration scenario as well but that shouldn’t cause too much grief.

We need to create the below projects in NWDS. The names in italics are our project names.
a) Dynamic Web Project ( JavaProxyWeb ). This will hold consumer proxy (sender objects) and servlet used for testing.
b) EJB Project ( JavaProxy ) : This will hold service implementation on the receiver side.
c) EAR (JavaProxyEAR) – EAR to deploy JEE objects.
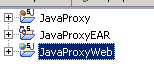
So we have the below three projects to start our work..
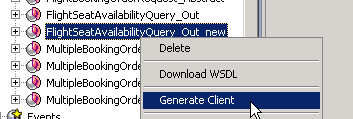
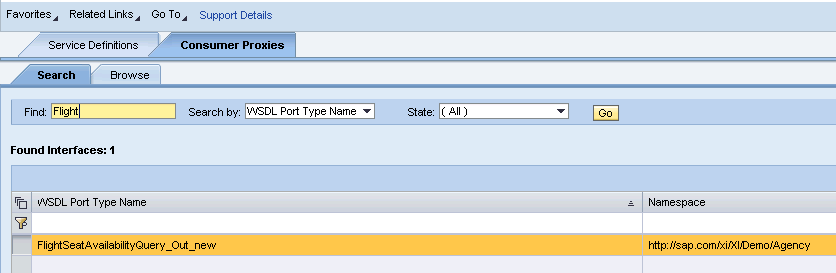
Consumer Proxy Generation
Let’s generate code on the sending side ( consumer proxy ) . We don’t want to chose a Javabean as there is no actual service implementation. We’re just generating client to call our proxy and hence chose “Generate Client”.
.
In the next screen , check the values of Server/ WebService runtime and verify your Dynamic Web Project and EAR project are chosen.
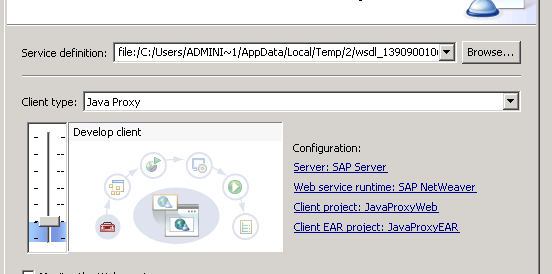
And we don’t have to WSDL as we’re not really using the end-points for any service all . We’ll be creating a configuration scenario in PI Designer to generate the configuration.
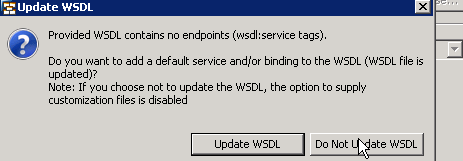
After that, let the wizard go through default values and just press finish.
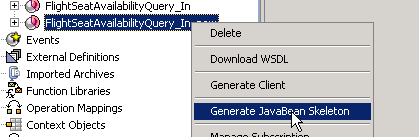
Inbound Service Generation
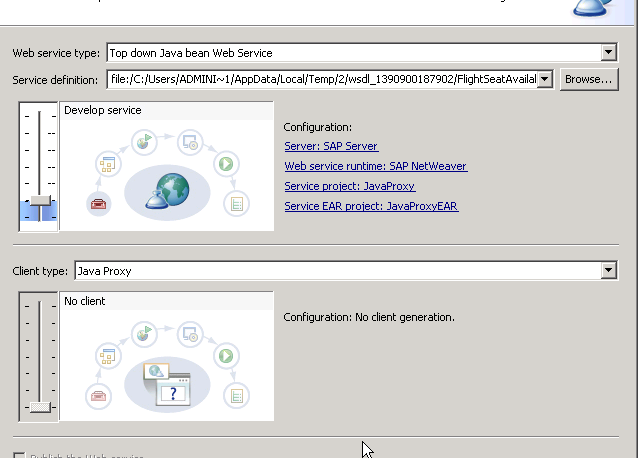
For our inbound service implementation, let’s take the corresponding service interface. This time we want to generate a bean and hence chose “Generate JavaBean Skeleton”.
And as we’re not really going to use any client, we can move the slider for client to minimum and just generate the shell for the Web Service.
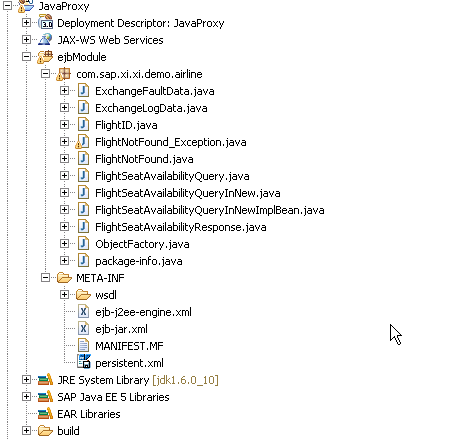
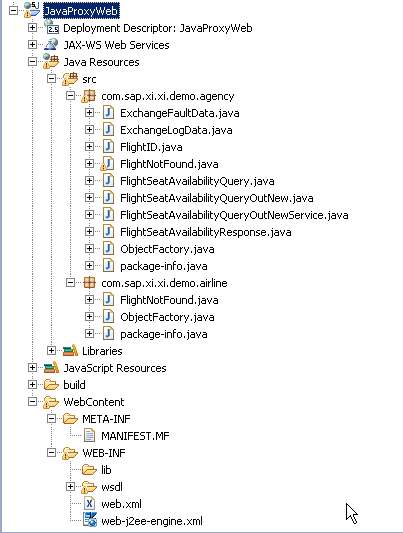
Our EJB project looks something like this.
And the web project should look similar to this.
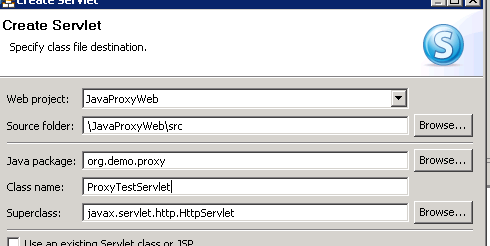
Adding Servlet to web project ( for testing )
As we need a servlet for testing, let’s create one in our web project.
Additions to servlet which makes the outbound proxy call object
Add the WebService annotation with the service name and create an instance of the Service.

This is the outbound service call. We need to create an instance of port and as we’re using XI as the message protocol, we need to use methods from XIManagementInterface.
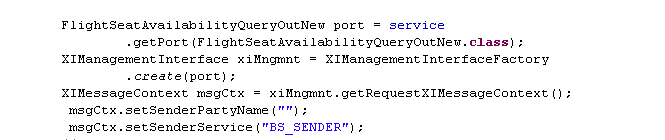
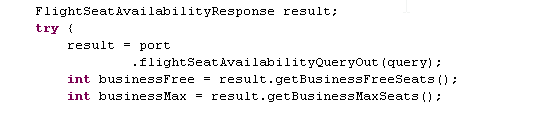
and the actual proxy call to get the result.
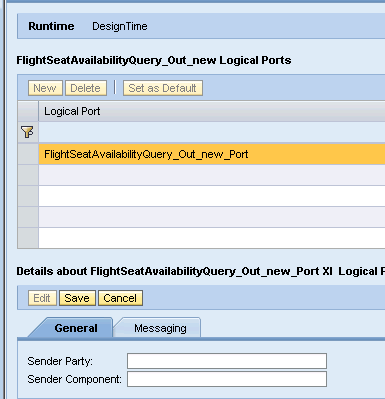
We have set the business system programmatically. It’s also possible to not set it here and instead set Party and Sender Service in configuration for Java proxies ( this appears once the project is deployed ) in Port Configuration.
Inbound Service Implementation
For the inbound service implementation, we’ll need to add @XIEnabled annotation and it’ll need @TransportBindingRT as well. Add @XIEnabled and IDE will help with @TransportBindingRT as they’re required together.

Project Deployment
Our EAR has our EJB as well as dynamic web project.Deploy the EAR .

Service verification in NWA
Once the project is successfully deployed, we should be able to find our consumer proxy . This was actually confusing for me. I tried to deploy the generated client without the actual service call in servlet and it never worked for me. Only when I created the servlet making the outbound call I could see the outbound proxy. It’s best to finish outbound proxy and inbound service implementation along with consumer application ( servlet in this case ) and then try to deploy them in one shot.
Below is the screenshot of the port configuration . We can set the party/ business system here if it’s not set programmatically.
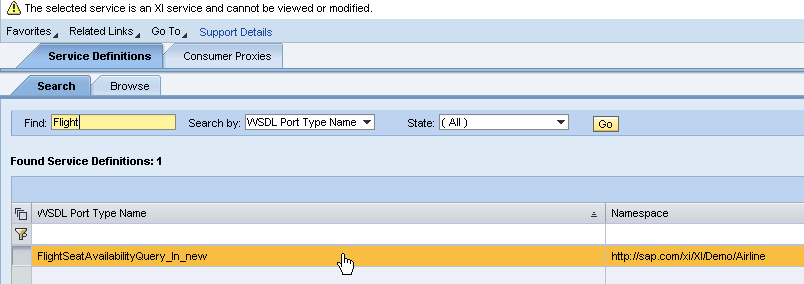
Similarly, the inbound service shows up as well in Service Definitions.
Our development is done. Now, we need to create an integration flow with the required sender / receiver interface values.
Sender communication channel uses XI message protocol for a SOAP adapter and HTTP as the transport protocol.

Similarly, create a receiver communication channel of type SOAP, using HTTP as transport protocol and XI as message protocol.

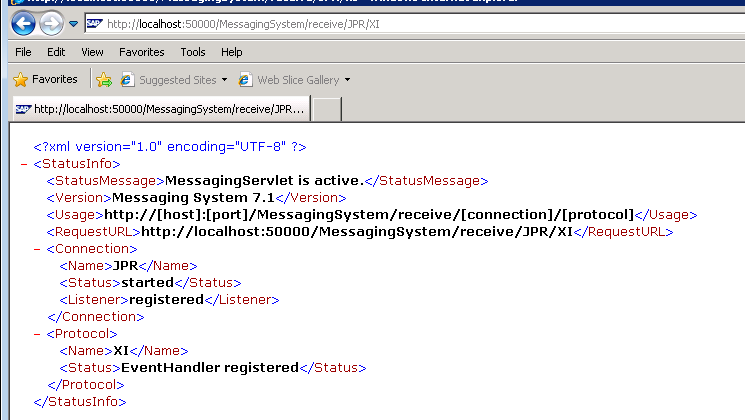
Path prefix for sending proxy messages bia JPR is /MessagingSystem/receive/JPR/XI.
Do a test with the URL going to be used on the receiving side to verify it’s running.
Now, configure the receiver communication channel. Change the authentication mode to “Use logon data to no-SAP system’ and provide
authentication credentials.

Activate the iFLow and we’re ready to test the set up.
Testing
Fire the servlet and it should come up with the below screen
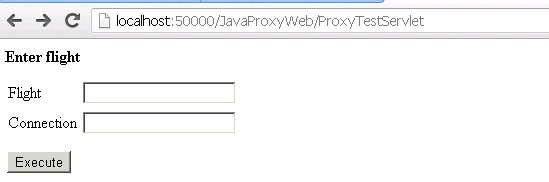
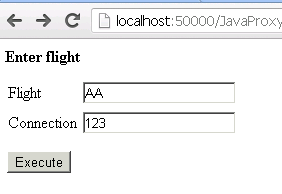
Put your flight and connection details. We aren’t really using the date and hence it’s not in screen.
And if everything goes well, we should get the below screen.
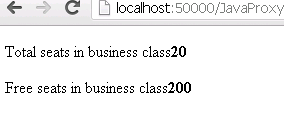
Voila ! Our proxy worked and it has come back with the response.
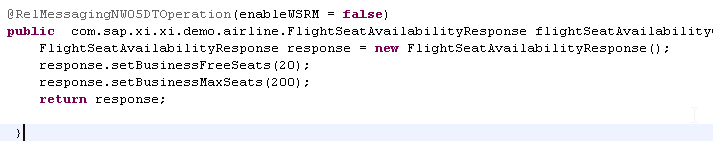
This matches with our service implementation – we’re just returning 20 free and 200 max business class seats .
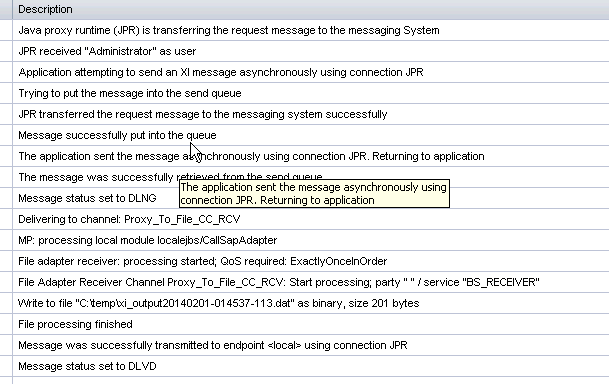
The message can be displayed in RWB / PIMON.

The audit log confirms that JPR has successfully delivered the message along with the response message.

The source code is available on https://github.com/viksingh/PIJavaProxy . I’ve just put the outbound proxy call in the servlet and the inbound service implementation as these are the two files we need to modify. Rest all were left standard including deployment descriptors.
Debugging Java applications on SAP PI/PO
Posted: February 1, 2014 Filed under: SAP, SAP Java | Tags: java, SAP PI, SAP PO Leave a commentFrom my post on SCN – http://scn.sap.com/community/pi-and-soa-middleware/blog/2014/01/25/debugging-java-applications-java-mapping-java-proxies-etc-on-sap-pipo
Below are the steps to debug any Java application on SAP PI/PO – they are generic for SAP AS Java server .It can be used to debug Java mappings, Java proxy calls in PI etc.
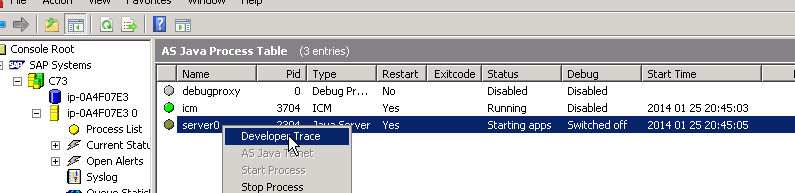
-Log on to SAP management console and click on developer trace. There is documentation of SAP AS Java ports here.
http://help.sap.com/saphelp_nwpi71/helpdata/en/a2/f9d7fed2adc340ab462ae159d19509/content.htm
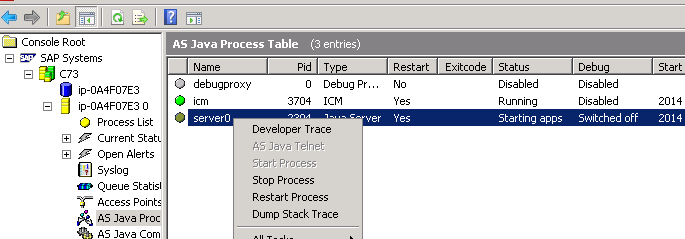
However, it’s easiest to just look at the Developer Trace and get the port number. You may need to ask Basis to supply this information as it requires access to SAP management console.
– In this case, the debugging port is 50021 .
– From SAP management console, enable debugging.

-The port number can also be verified by looking at debugging “Switched on (50021)” column.
– To debug the application, create a debug configuration in NWDS. It can be selected from Run -> Debug Configurations.
Use ‘Remote Java Application’ as the application type.


-Create the configuration specifying the project name and click on Debug.

– This launches the debug mode.Confirm to use the debug mode.
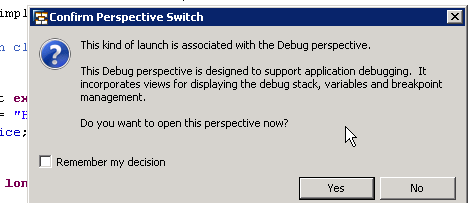
– We’re ready to start debugging the Java code.
The code can be any Java object :
– I tested with SAP PI Java mapping – in this case you have to let the map execute by processing a message.
– This example is a SAP Java proxy I was testing and had issues in figuring out the error. Hence, I created a simple Servlet which fires a message.

and the Servlet can be executed allowing us to debug any J2EE application component.


I hope it’s useful for SAP PI developers as especially with single Java stack, there are going to be more Java objects created and being able to debug is efficient.
Furthermore, in PI Java mappings sometimes we need the actual data and environment to test the application and making a dummy call from main to call transform / execute can’t doesn’t provide the information. An instance of this could be a JDBC call to read a PI table.
Use SAP DCs and SAPUI5 to build development objects for SAP PI/PO
Posted: February 1, 2014 Filed under: SAP, SAP Java, SAP PI/PO, SAPUI5/OpenUI5, Software | Tags: java, SAP DC, SAP Java, SAP PI, SAP PO Leave a commentFrom my post on SCN – http://scn.sap.com/community/pi-and-soa-middleware/blog/2013/09/26/use-sapui5-and-sap-dcs-to-build-development-objects-for-pi-731
PI 7.31 introduces a Java only version of PI. This obviously is much more efficient for message processing. However, many existing XI/PI customers have built processing logic on ABAP stack. In this blog, we’ll look at the steps that can be carried out to create similar functionality on Java stack. I hope the information will be useful and I welcome any suggestions/comments.
I’ll take a sample use case – dynamic receiver determination based on custom table entries. ( i.e. based on file name, route the message to different receivers ). For our discussion, the table will be very simple – it has three columns : id, filename and receiver. Id is primary key and filename is the field that is compared to pattern match with the message’s filename to determine the receiver business system. The table is too simplistic and data won’t be normalized but let’s ignore that for now .
Of course, it can be easily implemented using XPath expressions in PI 7.31 but I’m using this as it covers a functionality that was often implemented by clients on ABAP stack and it’s a good use case as we can use it to show usage of persistence. On ABAP stack, this functionality can be implemented using the following approach.
- – Create an ABAP class (with interface IF_MAPPING ) for processing logic where lookup on custom table is performed. This ABAP class is used in the operation / interface mapping.
- – SM30 can be used for table maintenance
- – SE16 can be used to display table entries.
As shown in the below diagram, a message may arrive / leave at Java stack but the scenario used ABAP development infrastructure. Of course, it was not mandatory but given ABAP skill set being more widespread in SAP landscapes we had the below situation in many cases.

So in a file to file transfer, the FTP adapters (on Java stack ) will receiver / send files and an ABAP map is used to perform lookup to find the receiver.
Option from PI7.31 onwards:

The following approach could be taken to create similar functionality on Java stack:
- Create tables in Java dictionary.
- Since SAPUI5 is supported by SAP AS Java and is the recommended UI by SAP, it can be used to build display and maintenance screens.
- – For server side processing ,we can use servlets to handle requests from SAPUI5 client. We’ll need two servlets – one to display data entries already in database and a second one to create new entries.
- – Receiver determination class is on Java stack where we can use Lookup API in a java mapping program. This is a normal Java map and can be built using DatabBase Accessor. I won’t cover in this blog but the github link for this project has the code which can be referred.
To keep the model simple, we can perform database operation in the servlet itself via JPA and not really go via EJBs. EJBs can be used for more complicated scenarios.
Additional Libraries Required:
- As it’s much more easier to use JSON with any Javascript library including SAPUI5, we’ll use Google GSON libraries to convert server side response to a JSON message.
Hence, our development objects will look somewhat like this.

We’ll use SAP Java Development Components ( DCs ) to leverage benefits of NetWeaver Development infrastructure for lifecycle management.
Some customers may still want to maintain the database on ABAP stack ( e.g. in their ECC system / SOLMAN etc .) and have it replicated to Java stack. In these cases, the messages can be sent to Java AS over HTTP via a RFC destination by tying it in with changes over ABAP tables. In case servlet expects/ returns JSON messages, we can use the standard ABAP class /SDF/CL_E2E_XI_ALERT_JSON_DOC / use SCN’s code exchange to get the JSON tool in case your ABAP system doesn’t have this standard JSON processing class.
In this case, the scenario will look like as below.

Implementation Steps ( our original scenario using SAPUI5):
- Google GSON libraries: Create a DC of type external library with Google GSON jar to package the required libraries. This is required as the servlet response will be in JSON format which can be easily interpreted by the client side SAPUI5 JavaScript code.
- – Create a DC for external library and add the jar file to libraries folder.

Change the access to allow access for both COMPILATION as well as ASSEMBLY.

- – Ensure that both public parts have jars.

2. Create a dictionary DC. It’ll have an ID column and FILENAME and RECEIVER columns. Based on FILENAME, we’ll determine the RECEIVER.

Create dictionary and deploy it to SAP Java Server.

- – Create an additional TABLE for generating keys. We’ll use this later for primary key generation.

- – Verify that the table exists on database. You may switch to database development perspective. Create a connection using your dB connection details.

3. Create an EE application of type “Web Module” and perform the following steps:
- Add JPA support by modifying project facet.


- – Generate entities from tables. This will generate a class for the database table.


It should already have the below annotation.

As we’ll use key generation from a different table (TMP_KEYGEN) , the below annotations are required.

Update persistence.xml to change the transaction type as Local as we’ll be managing transactions in servlet code while persisting data.

- Add SAPUI5 libraries – Refer to the below blog for detailed steps.
- http://scn.sap.com/community/bpm/blog/2013/01/14/developing-sap-ui5-applications-in-sap-netweaver-developer-studio–part-22
- In summary:
- Add SAPUI5 SCAs and put dependency for both the DC as well as the SC.
- Add SAPUI5 Javascript libraries.
- Add SAPUI5 Java libraries.
- Update web.xml to add components required for SAPUI5
- – We’ll create two servlets: RetrieveData will display existing table entries and UpdateData is used to create entries. Both servlets will need to have the JPA information injected at runtime and hence we need the following annotation / declaration.

RetrieveData servlet will return all values in the database.

- – UpdateData inserts values to the database table:

write( response, map ) is a helper method has been written to write the JSON response – it’s the last 3 lines of the previous servlet.
Nothing too fancy in html file – it calls the main view.
![]()
I won’t go throught the entire JS code. Essentially it builds the views shown later below. The Javascript code invokes GET method on RetrieveData servlet. Here, we invoke a GET method on RetrieveData servlet and push the result into an array which can later be bound to a table that will be displayed.

And code to trigger POST. We just display an alert message .

Java files structure for the web module:

and files for UI in the web module:

This is how the project DCs look.

Dictionary DC was created and deployed separately as it doesn’t have to be part of this EAR.
jsonlib: Has Google GSON libraries for Java processing.
detcvr: It’s the webmodule – It has servlet , views as well as JPA generated entity file.
dtrcvear: It is our EAR to deploy the application to SAP AS Java.
This is how the screen turns out to be. We can maintain values :

And entries are dsiplayed using the “Display Routing Values” tab.

To test in PO, create an iFLow with two receivers, one default and the second one will be determined based on Java map which will perform a lookup on the table to get the receiver business system based on filename. Configure Routing with Dynamic Message Router

and process two files: First with an arbitrary name and second one has name starting with IN which was updated in our dB by SAPUI5 application. Based on the table entry, the message is routed to BS_DUMMY_IN business system.
![]()
The code for this project can be referred at https://github.com/viksingh/PIDYNAMICRCVDCs .
Reducing integration effort by leveraging SAP enterprise services part2
Posted: February 1, 2014 Filed under: SAP, SAP ABAP, SAP PI/PO | Tags: SAP ABAP, SAP PI, SAP PO Leave a commentFrom my post on SCN – http://scn.sap.com/community/pi-and-soa-middleware/blog/2013/06/04/reducing-integration-effort-by-leveraging-sap-enterprise-services-part2
This is in continuation of the first blog on reducing integration effort by using SAP enterprise services (http://scn.sap.com/community/pi-and-soa-middleware/blog/2013/06/04/reducing-integration-effort-by-leveraging-sap-enterprise-services )
I’ll describe the steps in more detail here.
Step1. Identify services required.
Go to http://esworkplace.sap.com/ and identify the service required. There’re various ways you can navigate the content. If you’re implementing a new scenario, typically a complete process , you can use integration scenarios ( e.g. agency business ) . Using solution map is higher level ( e.g Sales Order Management ) . Business Scenario Description seems hybrid of the above two and I prefer that. Then, in each bundle you can navigate to the service operation and read through the documentation. Make sure the selected operation is not deprecated. SAP has good documentation around features, configuration required in backend system, error handling and any business function required.
Step2. Identify system set up requirements
Identifying all operations will help to come up with a list of requirements for system set up. It’s relatively straight-forward in PI as we just need to import the software component. However, for the back end system, there can be couple of scenarios:
– Service requiring business function activation (e.g. SAP APPL 6.04 requires LOG_ESOA_OPS_2 activation) .
– Service requiring add-ons to be installed by BASIS in SAINT transaction (e.g. ESA ECC-SE 604 requires BASIS to install ECC-SE add on).
Get the ECC activities organised (as mentioned in part1, some of the business functions are irreversible) and import corresponding PI SWCVs into ESR – these could be downloaded from SMP and imported as usual.
Step3. Check components are completely installed in the system.
Go to transaction SPROXY. If the ECC system satisfies all the pre-requisites and PI has the components as well, the SWCVs should appear in transaction SPROXY.

In SLD, the ECC technical system should have the additions appearing as a software component version in Installed software of the ECC technical system.

Step4. Create custom software component version. This is strictly not required but in experience, there’s always a need to customize messages and hence it should be created with the required service’s SWCVs as the underlying SWCV.

Step5. Test: Once the services are in ECC, you can use them to start doing testing.
Use transaction SPROXY for testing – this should help to identify the elements required in the message to be populated and the business documents processed. In experience, this is where you’ll spend the maximum time trying to identify what is required, where to populate the information etc.
You can test using SOAMANAGER as well but I prefer to just use SPROXY and then when the PI configuration is complete use SOAPUI.
Step6. There will be cases where the standard doesn’t fit the requirement completely. In that case, perform a data type enhancement in SAP PI in the custom namespace.

This should make the data type enhancement show up in ECC SPROXY. Creating the proxy here will update the ECC structures which are used by backend ECC classes for business document processing.

Step7. Some Hints: As usual, testing can be done by configuration in ID and using SOAP UI. Just couple of hints here:
Many of the standard services are sync and ensure that message logging for sync interfaces is on.
The messages appear in SXMB_MONI in ECC only when there’s an error (not application error but more like a system error like configuration, input message not conforming to length / type restrictions etc).
For debugging, you can create a comm channel with your username and turn on HTTP debugging if you’re trying to investigate the SOAP message (say headers).
Step 8: Special case: Lean Order being too Lean !
For one of the scenarios, while creating sales order we realised that lean order doesn’t have the fields we’re interested in. However, there’s a good document on SMP about “Enhancement Options for the Lean Order Interface” and it was very helpful
Step 9: Generate some positive karma – Do some good for people maintaining it later. As the development on ECC side is going to involve mostly enhancements, two things can really be useful.
– Keep all the enhancements in a composite enhancement.
– Create a checkpoint group so that it’s easier to debug messages.
Step 10: Logging in SAP: For synchronous interfaces, SAP does return the proper messages back to the calling application. However, the functional team doesn’t have access / interest to access PI to look at the errors. Hence, we had to build logic to update the messages as an application log (which can be checked in SLG1). This in some ways satisfies their requirement to look at the system to figure out what’s going on.
This is one area where perhaps either I’m missing something or SAP needs to provide information so that users / functional consultants can monitor the messages. Many functional consultants don’t want to even try to look at XML.
A simple class can be created to log the information and call them at appropriate enhancement points. However, we also created a generic method to convert any exception into a BAPI message.
Code can be referenced here.
https://github.com/viksingh/abaputilities/blob/master/exception_to_message_table
Couple of observations where things could potentially by improved by SAP.
– There should be a free tool by SAP to let users/ functional teams monitor messages during testing. I’m aware of AIF but don’t have experience as it’s not free.
– Lack of out of box support for JSON RESTful web service in SAP PI. The initial requirement was to use them but then the source application had to be modified to use CXF to generate SOAP web service calls on the calling application side. I was almost ashamed to go back to the third party
Some of the books & articles I found useful.
SAP Press Book: “Developing Enterprise Services for SAP”: Although I referenced this book only recently, I found an absolute joy to read and did pick up many things. This definitely helped to refine some of the ideas.
http://www.sap-press.com/products/Developing-Enterprise-Services-for-SAP.html
Enterprise Services Enhancement Guide
http://scn.sap.com/docs/DOC-18402
SOA MADE EASY WITH SAP
http://scn.sap.com/docs/DOC-17416
Blog-Add a field to LORD API
Reducing integration effort by leveraging SAP enterprise services part1
Posted: February 1, 2014 Filed under: SAP, SAP ABAP | Tags: SAP ABAP, SAP PI, SAP PO Leave a commentFrom my post on SCN – http://scn.sap.com/community/pi-and-soa-middleware/blog/2013/06/04/reducing-integration-effort-by-leveraging-sap-enterprise-services
The motivation of the blog is a conversation I had with couple of friends. They had implemented a new SAP functionality but were hassled by the amount of effort spent in integration. They eventually completed the task but after lots of crazy hours on late nights and sometimes weekends. As both the integration as well as the functional person is a friend and didn’t know about using enterprise services, I realised that perhaps not everyone is using enterprise services. Further, I was designing and implementing a solution to integrate SAP ECC with an external application for managing distributors and thought to write this post. Our integration required sending master data from SAP and transactional data updates in SAP ECC in OTC / P2P process area triggered from the external application.
Starting with the basics, look at the definition from SAP from BBA guide.
Enterprise Services: Web services using a common enterprise data model based on process components, business objects, and global data types, and following consistent communication patterns. SAP exposes software functionality as enterprise services.
There’s good documentation at http://esworkplace.sap.com/ .
In integration world, I see them as equivalent of classes in application development. If you’re able to use pre-existing content, most of the work is already done for you.
Why to go for enterprise services instead of trying to build them from scratch – what are the practical benefits?
– Leverages pre-built solutions reducing in substantial development effort reductions. We were able to reduce development effort to around 60% of initial estimates and even this is high because of the first time efforts in understanding their architecture and doing some prototyping.
– Easy to extend: Any project will require customization not delivered by standard solution and normally making changes later on is very time-consuming. Most of the functionality is already covered and even if additional changes are required – SAP has given a nice framework to customize them first in PI and then carry out adjustments on SAP system in ABAP stack.
– Comes with a lot of bells and whistles: Have error handling, data validation pre-built.
The following points need to be considered though:
– We utilised various software component versions and there were two mechanisms to get them installed in our landscape.
a) Some require installation of an add-on in ECC requiring BASIS effort (e.g. ECC-SE add-on to be installed by BASIS).
b) Others require activation of irreversible business functions (e.g. ESOA_OPS01 for services in SAP APPL). It’s important to understand that some of the business functions can’t be reversed and hence some amount of regression testing of affected areas need to be performed. SAP provides a test catalogue about the impacted functionality which can help in determining the impact. We tried them first in sandbox. Initially the activation didn’t go smoothly resulting in ABAP dumps which go away on activation. However, it’s painful as you have to wait for a transaction to dump before activating it. After an OSS message, finally we regenerated all programs of EA-APPL, ECC-SE and SAP_APPL software components.
At a very broad level, there are 5 different activities that need to be done.
i ) Identify which services meet requirements completely ( or to the largest possible extent ). There can be more than one service for a given business function ( e.g SalesOrderERPCreateRequestConfirmation_In_V1 and SalesOrderERPCreateRequestConfirmation_In_V2 for sales order creation ). I noticed two things: The former wasn’t able to meet all our requirements and has been deprecated as well. Like any other artefact in software engineering it’s best to avoid deprecated services.
ii) PI configuration: This was straight forward in our case as it was simple SOAP to proxy and reverse.
iii) Back end ABAP adjustments: These were made to fill in organizational data as the third party system doesn’t have concept of some of the organisational structure, data etc.
iv) BASIS activities: Installation of add-ons (e.g. ECC-SE add on via SAINT), regeneration of affected ABAP programs via SGEN.
v) Co-ordination of regression testing: This may involve change management, regression testing and functional owner of the application / process area.
Some of the points we learnt from experience:
– Be ready to spend time in advance of the actual development in prototyping and investigation. However, it pays back in later stages of projects.
– We had to build application logging on ECC side so that in case of errors a functional person knows what to look for.
– There was one instance where we had to overwrite SAP solution. Fortunately, it can always be over-written as a post-exit method in the implementing ABAP class.
– Update some of the system parameters ( e.g. icm/keep_alive_timeout parameter in downstream PI systems). While transporting ESR contents, we realised that the transport import was failing after 5 minutes. These ESR transports with stnadard SAP content can get really big and it’s best to send them in separate transports (for each SWCV) . Our first attempt in trying to import them took 22 minutes in total!
In part2, I’ll describe the steps in more detail to make the implementation process clearer but from our experience, SOA is definitely not dead!
Link to part 2 : http://scn.sap.com/community/pi-and-soa-middleware/blog/2013/06/04/reducing-integration-effort-by-leveraging-sap-enterprise-services-part2
